- Press the
 home button, if
necessary.
home button, if
necessary. - Select Settings.
- Select Contacts Manager. Enter the administrator password, if necessary.
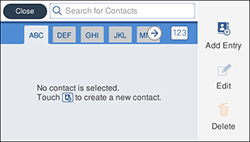
- Select Register/Delete. You see a screen like this:
- Select Add Entry.
- Select Add Contact.
- Do one of the following:
- Select the registry number you want to use for the contact you are adding.
- Select the Name field, use the displayed keyboard to enter the contact name (up to 30 characters), and press OK.
- Select the Index Word field, use the displayed keyboard to enter a word to use when searching for an entry (up to 30 characters), and press OK. (This field is optional.)
- Do one of the following:
- For an email contact, select the Email Address field, use the displayed keyboard to enter the address, and press OK.
- For a network folder or FTP location, select the Communication Mode field and select Network Folder (SMB) or FTP. Then select the Location field, use the displayed keyboard to enter the location, and select OK. Enter other information if necessary.
- Select OK.