You can
create a group of contacts so that you can easily send faxes to
multiple recipients.
Note: You can
create up to 100 contacts and contact groups combined. You must
create a contact before creating a contact group.
- Press the
 home button, if
necessary.
home button, if
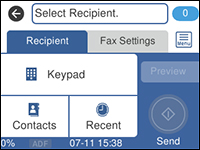
necessary. - Select Fax. You see a screen like this:
- Select Contacts.
- Select Add Entry.
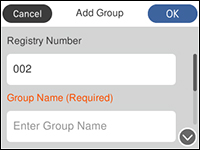
- Select Add Group. You see a screen like this:
- Select the Registry Number field and use the on-screen keyboard if you want to change the registration number assigned to the new group. (Changing this field is optional.)
- Select the Group Name field, use the displayed keyboard to enter the group name (up to 30 characters), and press OK.
- Select the Index Word field, use the displayed keyboard to enter a word to use when searching for a group (up to 30 characters), and press OK. (This field is optional.)
- Select Contact(s) Added to the Group. You see your contacts list.
- Select the contacts you want to include in your
group.
Note: To display the contacts in alphabetical order, select Name Order Display.A check mark appears next to each selected contact.
- Select OK.