Configuring a Product IP Address Using EpsonNet Config

You can configure the product's IP address using EpsonNet Config.
  1. Turn on the product.
  2. Connect the product to a network using an Ethernet cable.
  3. Do one of the following to start EpsonNet Config:
    • Windows 10: Click and select EpsonNet > EpsonNet Config.
    • Windows 8.x: Navigate to the Apps screen and select EpsonNet > EpsonNet Config.
    • Windows (other versions): Click or Start and select All Programs or Programs. Select EpsonNet > EpsonNet Config.
    • Mac: Open the Applications folder, open the Epson Software folder, and select EpsonNet > EpsonNet Config > EpsonNet Config.
    After a few moments, the program displays the connected products.
  4. Double-click the product you are configuring.
    Note: If several products of the same model are connected, you can identify them by their MAC address.
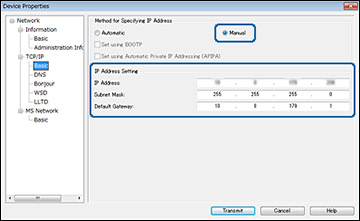
  5. From the menu on the left, select TCP/IP, and select Basic. You see a window like this:


  6. Select Manual.
  7. Enter the product's IP address, Subnet Mask, and Default Gateway settings in the fields provided.
    Note: To connect the product to a secure network, enter a static IP address. You can also configure the DNS settings by selecting DNS, and enter proxy settings by selecting Internet from the TCP/IP menu.
  8. Select Transmit.