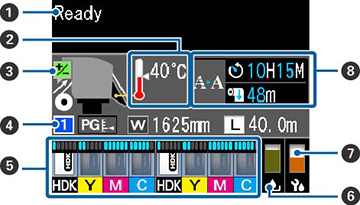
Control Panel Parts


1  power button
2  power light
3  media setup button
4 LCD screen
5 Menu button
6  back button
7 Left and right arrow buttons
8 Up and down/media feed buttons
9 OK button
10  heat/dry menu button
11  maintenance button
12  pause/cancel button
13  internal light button

LCD Screen Display


1 Status messages
2 After heater temperature status

: After heater is the selected temperature

: After heater has not yet reached the selected temperature

3 Feed adjustment information, if you have entered a value during printing
4 Media information

Displays, from left to right, the selected media (0 indicates RIP settings are in use), platen gap, media width, and remaining media.

: platen gap is 1.6

: platen gap is 2.0

: platen gap is 2.5

: width of loaded media

: remaining length of loaded media (increments of 3.9 in [0.1 m])

: remaining length of loaded media (increments of 39.4 in [1 m])

5 Chip unit status (see the next table)
6 Waste ink bottle status

The waste ink bottle status indicates the waste ink level and changes from normal (left) to warning or error status (right) if necessary.

: Waste ink bottle is almost full; prepare a new waste ink bottle

: Waste ink bottle is full; replace the waste ink bottle

7 Head cleaning set status

: The level on the icon goes down as replacement time approaches

8 Cleaning notification

Displays the time or remaining media length before an automatic or periodic cleaning occurs

Chip unit status

The chip unit status (1) changes from normal (left) to warning or error status (right) if necessary.
The ink color is shown below (2).
  • HDK: High Density Black
  • Y: Yellow
  • M: Magenta
  • C: Cyan
Remaining ink level indicators
Ink is low
Ink is nearing the end of its life. Check the remaining ink in the ink tank using the scale on the ink pack and, if necessary, refill the ink and replace the chip unit.
Ink is out and printing is stopped. Replace the chip unit and refill the ink.
A chip unit for automatic charging is mounted. When ink gets low, a low ink warning does not appear. If the icon is flashing, the chip has been removed.
The lock lever is raised; automatic charging cannot occur. Lower the lock lever.
The chip unit is mounted incorrectly or incompatible.
Check the displayed chip unit message.
Related tasks
Replacing the Waste Ink Bottle
Replacing the Head Cleaning Set
Replacing the Chip Unit and Refilling Ink
Related references
Media Setup Menu Settings