Your product
broadcasts its network information for 60 minutes from the time ink
charging begins. If you run the product's software setup package
within this 60 minute period, the software automatically connects
the product to your wireless network without you having to enter
your network name (SSID) and password.
Note: If your
computer does not have a CD/DVD drive or you are using a Mac, an
Internet connection is required to obtain the product
software.
- Make sure your product is turned on but NOT CONNECTED to your computer with a USB
cable.
Note: With Windows, if you see a Found New Hardware screen, click Cancel and disconnect the USB cable.
- Insert the product CD or visit epson.com.jm/support and select your product to
download and run your product's software package.
Note: With Windows, if you see the message Do you want to allow this app to make changes to your device?, click Yes, then click OK on the next screen. On a Mac, if you see the message "EPSON" is an application downloaded from the Internet. Are you sure you want to open it?, click Open.
- Select your language and click Next (Windows), or click Continue and click Continue again (Mac).
- Accept the software license agreement to continue with software installation.
- When you see one of these
screens, click Install.
Windows
Mac
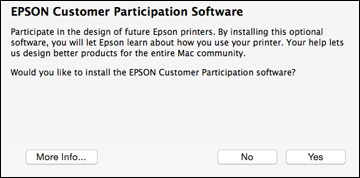
Note: On a Mac, make sure you install Software Updater to receive firmware and software updates for your product.Software installation may take several minutes. Wait for the installation to complete. - Mac: If you see the following message, click Yes or No to continue.
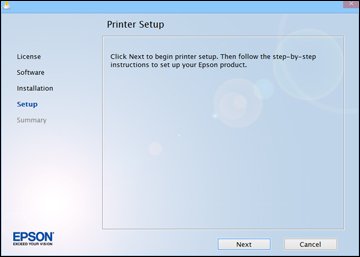
- When the Printer Setup screen appears, click Next (Windows) or Start (Mac) to begin setting up your product on your network.
- Confirm that the ink is
charged and do one of the following:
- If the ink is charged, click the checkbox on the screen and click Next (Windows) or Continue (Mac).
- If you have not charged the ink, follow the instructions on the Start Here sheet.
- When you see this screen, select Wireless connection and click Next (Windows) or Continue (Mac).
- When you see this screen, select Set up printer for the first time and click Next (Windows) or Continue (Mac).
- When you see this screen, select Yes and click Next (Windows) or Continue (Mac).
- If you see the Firewall
Warning screen, click Next to
continue.
Note: If you see a firewall alert message, click Unblock or Allow to let EpsonNet Setup continue. Do not select Ask Me Later, Keep Blocking, or Block.
- Do one of the
following:
- Windows: If you see a screen like this, follow the on-screen instructions:
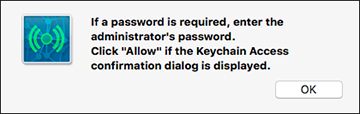
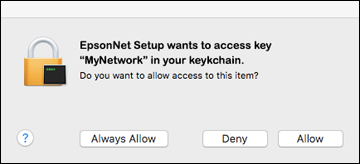
- Mac: If you see the following messages, click OK and click Allow to let EpsonNet Setup access your password information.
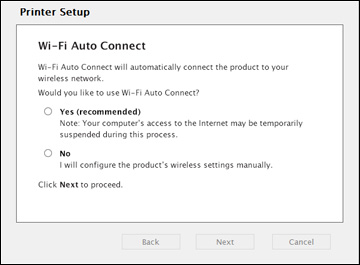
- Follow the on-screen
instructions to let the system automatically configure your product
on your network.
Note: If the software cannot automatically configure your product to the network, you may be prompted to enter your network name (SSID) and password on a displayed screen. You can also select a different Wi-Fi setup method.
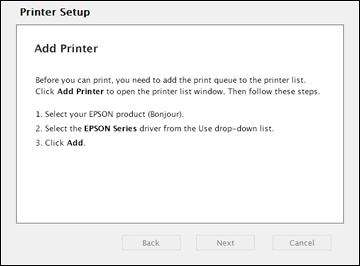
- Mac: When you see this screen, click
Add Printer and follow the
on-screen instructions to add your product and the print queue to
your system. Then click Continue.
Note: Be sure to select your Epson product in the Use or Print Using drop-down list.
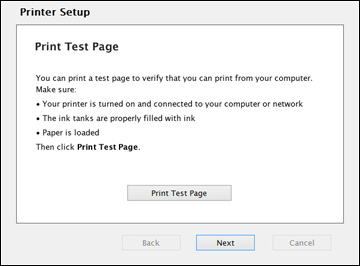
- When you see this screen, print a test page and click Next (Windows) or Continue (Mac).
- Windows: The system begins searching for the
latest firmware for your product. If you see a screen indicating
that there is new firmware for your product, click Install item(s) and follow the on-screen
instructions.
IMPORTANT: DO NOT TURN OFF YOUR PRODUCT OR INTERRUPT THE FIRMWARE SEARCH PROCESS IN ANY WAY.
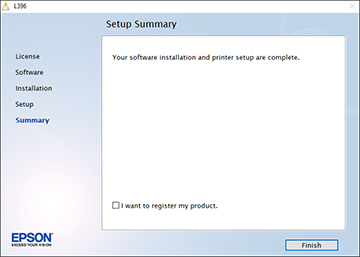
- Follow the on-screen instructions to complete product setup. When you see this screen, click Finish (Windows) or Close (Mac) to close the installation program.