If the print
surface is too far from the print head, print quality declines and
ink may mist on the inside of the printer. To prevent this, adjust
the platen to its optimum height.
The optimum platen height is one position from the first Ready message on the LCD screen or two positions from the last Platen Height Error message. For example, if the printer displays a Platen Height Error message at position number 1, select position number 3 as the optimum platen height. If the printer displays a Ready message at position number 2, select position number 3 as the optimum platen height.
| Position number | LCD message |
|---|---|
| P | Platen Height Error |
| 1 | Platen Height Error |
| 2 | Ready |
| 3 | Ready (optimum platen height) |
Note: The
positions above assume that the printed surface of the garment is
the highest surface on the platen. Seams, collars, zippers,
pockets, and other raised areas will require a higher platen height
and result in reduced print quality.
Caution:
Incorrect platen height settings cause
excessive ink mist buildup inside the printer. If you notice ink
mist accumulating, adjust your platen height settings.
- If the
platen is not in the forward position, press the
 moveable base button to move the
platen forward.
moveable base button to move the
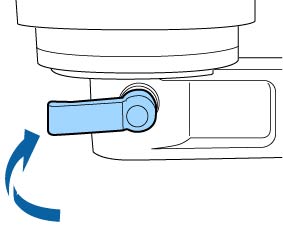
platen forward. - Rotate the fixing lever beneath the platen as shown to loosen it.
- Rotate
the height adjustment lever to adjust the height of the platen to
one of these starting positions:
- When printing on T-shirts using the large garment, medium garment, small garment, or extra small garment platens with spacers a and b attached, select 3 on both spacers.
- When printing on T-shirts using the large garment, medium garment, small garment, or extra small garment platens with spacers a and b attached and a grip pad attached, select 4 on both spacers.
- When printing on shirts using the sleeve platen or medium-grooved platen with spacer b attached, select 3.
- When printing on sweatshirts or thick fabric, select 8.
Note: If you remove both spacers, the height adjustment position numbers are no longer visible. To find the optimum platen height, move the height adjustment lever to the left until it stops then move it 3 positions to the right. Use this position as a starting place for making further height adjustments. - Rotate the fixing lever as shown to tighten it and secure the height adjustment lever.
- Press
the moveable base button to move the
platen into the printer.