Before you
can project from your wireless network, you must select the network
settings for the projector using its menu system.
- Turn on the projector.
- Press the Menu button.
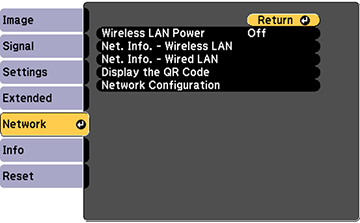
- Select the Network menu
and press Enter (
 ).
).
- Select On as the Wireless LAN Power setting and press Esc.
- Select Network
Configuration and press Enter ().
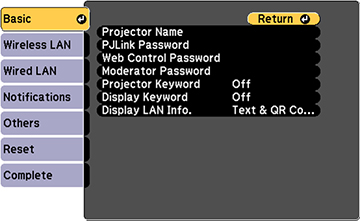
- Select the Basic menu
and press Enter ().
- Select the following basic options as necessary:
- Projector Name lets you enter a name up to 16 alphanumeric characters long to identify the projector over the network.
- PJLink Password lets you enter a password up to 32 alphanumeric characters long for using the PJLink protocol for projector control.
- Web Control Password lets you enter a password up to 8 alphanumeric characters long for accessing the projector over the web. (Default user name is EPSONWEB; default password is admin.)
- Moderator Password lets you enter a password up to 4 numbers long for accessing the projector as a moderator with the Epson iProjection (Windows/Mac) software or the Epson iProjection app. (No default password.)
- Projector Keyword lets you turn on a security password to prevent access to the projector by anyone not in the room with it. You must enter a displayed, randomized keyword from a computer using the Epson iProjection (Windows/Mac) software or the Epson iProjection app to access the projector.
- Display Keyword lets you select whether or not to display a projector keyword on the projected image when using the Epson iProjection (Windows/Mac) software to access the projector.
- Display LAN Info lets you select how the projector displays network information. You can select an option to display a QR code that lets you quickly connect your iOS or Android devices using the Epson iProjection app.
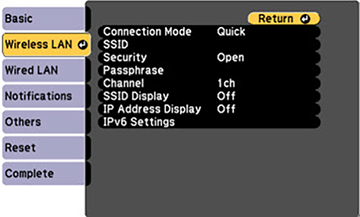
- Select the Wireless LAN
menu and press Enter ().
- Select the settings on the
Wireless LAN menu as necessary
for your network.
Note: Some items may be unavailable if Quick or Advanced connection mode is selected.
- When you finish selecting settings, select Complete and follow the on-screen instructions to save your settings and exit the menus.