Follow these steps to assemble the printer
stand and paper basket for the SureColor T5170 printer.
Note: You can
purchase an optional printer stand and paper basket for the
SureColor T2170/T3170 printer.
Before you begin, make sure you have enough space to
set up the printer as shown here.

| 1 | 2 inches (50 mm) |
| 2 | 12 inches (310 mm) |
| 3 | 6 inches (150 mm) |
Note: At least two
people are required to lift the printer onto the stand after it is
assembled.
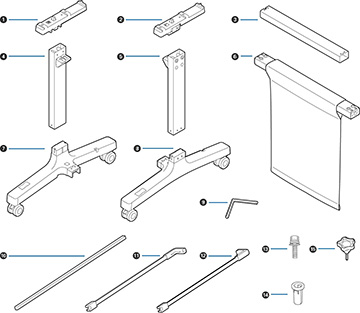
- Make sure you have all of these items
for assembly:
1 Left mounting bracket 2 Right mounting bracket 3 Support brace 4 Left leg 5 Right leg 6 Paper basket bar 7 Left leg base (square hole is the front side) 8 Right leg base (square hole is the front side) 9 Allen wrench 10 Paper basket rod 11 Left paper basket support rod 12 Right paper basket support rod 13 Screws (28; 24 if thumbscrews are included) 14 Screw holders (4) 15 Thumbscrews (4; not included with all stands) - Attach the support brace to the left leg base and the right leg base.
- Use the Allen wrench to insert 8 screws (four on each side) into the holes on the support brace and leg bases.
- Attach the legs to the bases.
- Insert 8 screws (4 on each side) into the holes in the legs.
- Push in the cloth on the paper basket bar so it does not get caught between the bar and the legs, and attach the bar to the legs.
- Insert 4 screws (2 on each side) into the holes on the paper basket bar to secure it to the legs.
- Make sure the L and R stickers on the mounting brackets are correctly oriented with the left and right legs and attach them as shown.
- Insert 4 screws into 4 screw holders (2 on each side) and insert them into the holes on the legs to secure the mounting brackets.
- Slide the paper basket rod into the pocket on the end of the paper basket cloth.
- Insert the top of the paper basket support rods through the loops on the paper basket cloth and attach them to the paper basket rods.
- Insert the ends of the paper basket support rods into the holes on the leg bases.
- Close the paper basket as shown.
- On the back of the paper basket and stand, attach the loops on the paper basket cloth to the hooks on the leg bases as shown.
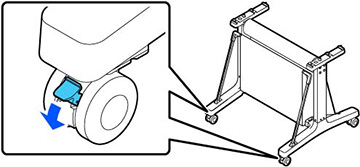
- On the front of the stand, lock the casters.
- Have at least two people lift the
printer using the indented areas as shown.
Caution:
- Align the notches on the printer with the notches on the back of the stand as shown and place the printer on the stand.
- Do one of the following:
- If your stand does not include thumbscrews, insert 4 screws (2 on each side) into the bottom of the mounting brackets to secure the printer to the stand. On the left rear side, insert the screw through the wired loop on the printer as shown.
- If your stand includes thumbscrews, insert 4 thumbscrews (2 on each side) into the bottom of the mounting brackets to secure the printer to the stand. On the left rear side, insert the thumbscrew through the wired loop on the printer as shown.