You
can attach a compatible lens to the projector.
Warning: Turn
off the projector and unplug its power cord before attaching or
removing a lens; otherwise you could receive an electric
shock.
- Turn off the projector and
unplug the power cord.
Caution:Avoid touching the lens with your bare hands to prevent fingerprints on or damage to the lens surface. Make sure the front of the projector is not facing up when you attach the lens. This prevents dirt or dust from entering the projector and lowering the projection quality.
- Use your hand to loosen the screw securing the lens cover to the projector.
- Press the buttons on the sides of the lens cover and pull the lens cover off the projector.
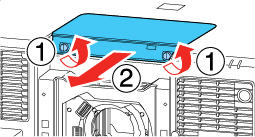
- If you are attaching the ELPLX02 or ELPLX02W lens, loosen the screws securing the lens replacement cover on top of the projector and slide the cover off as shown.
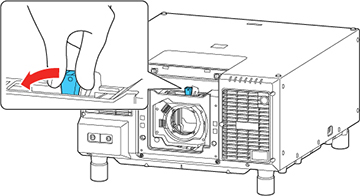
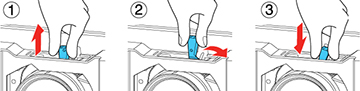
- If the lens lock lever is in the Lock position, release the lock lever. Pull the black lever up (1), pinch the metal tab against the lever, move it toward the Release position until it stops (2), and then push the black lever in as shown (3).
- If the lens has a cap covering its narrower end, remove the cap and store it for use if you remove the lens later.
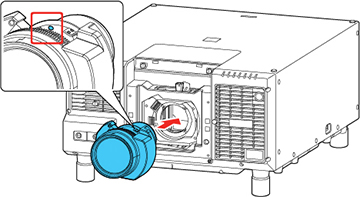
- Position the lens so the white circle is on top and insert the lens straight into the projector's lens socket.
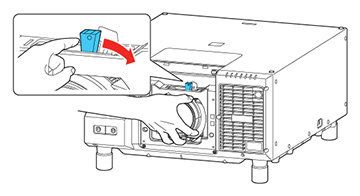
- Hold the lens firmly as you lock the lens in place. Pull the black lever up (1), pinch the metal tab against the lever, move it toward the Lock position until it stops (2), and then push the black lever in as shown (3).
- Replace the lens cover as shown.
- Tighten the screw to secure the lens cover to the projector.
- Do one of the
following:
- If you attach a lens that is different from the previous lens, you see a message to calibrate the lens the next time you turn on the projector. Select Yes to calibrate the lens.
- If you remove and attach the same lens, press and hold the Default button on the remote control for at least 3 seconds or select Lens Calibration in the Extended menu to calibrate the lens.
Caution:If you see a message that lens calibration failed, turn off the projector, unplug the power cord, remove the lens, and reinstall it. If you continue to see an error message, contact Epson.