- Make sure there are no errors on the LCD screen and the output tray is extended.
- Load a few sheets of plain paper in the product.
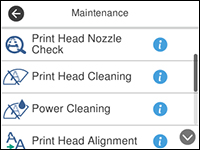
- Press the
 home button, if
necessary.
home button, if
necessary. - Select Maintenance.
- Select Print Head Alignment.
- Select one of the
following options:
- Ruled Line Alignment if straight lines are slanted or misaligned.
- Vertical Alignment if there are vertical gaps or lines in patterned areas.
- Horizontal Alignment if adjacent horizontal regions are overlapped or separated.
- Select Print to print an
alignment sheet.
Note: Do not cancel printing while you are printing a head alignment pattern.
- Check the printed pattern and select the number
representing the most solid printed pattern for each set on the LCD
screen.
Ruled Line Alignment
Vertical Alignment
Horizontal Alignment
- Select OK when you are finished.