You can
select or change wireless network settings using your product
control panel.
To install your product on a wireless network, follow the instructions on the Start Here sheet and install the necessary software by downloading it from the Epson website. The installer program guides you through network setup.
Note:
Breakdown or repair of this product may cause loss of fax and
network data and settings. Epson is not responsible for backing up
or recovering data and settings during or after the warranty
period. We recommend that you make your own backup or print out
your fax and network data and settings.
- Press the
 home button, if
necessary.
home button, if
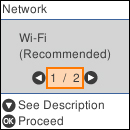
necessary. - Select Wi-Fi Setup. You see a screen like this:
- Select Wi-Fi (Recommended).
- Press the OK button to proceed.
- Select Wi-Fi Setup Wizard.
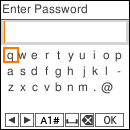
- Select the name of your wireless network or select Other SSIDs to enter the name manually. Use the displayed keypad to enter your network name.
- Enter your wireless password.
Note: The network name and password are case sensitive. Be sure to correctly enter uppercase and lowercase letters, and numeric or special characters.
- Select OK when you finish entering your password.
- If you want to print a network setup report, press the
 start button. (Otherwise,
press the
start button. (Otherwise,
press the  cancel button.)
 - Press the home button to exit, if
necessary. You see the
 icon on the LCD screen and should
be able to connect to your product directly from your computer or
device, and then print. If you are printing from a computer, make
sure you installed the network software as described on the
Start Here sheet.
icon on the LCD screen and should
be able to connect to your product directly from your computer or
device, and then print. If you are printing from a computer, make
sure you installed the network software as described on the
Start Here sheet.