Using the Home Screen

You 
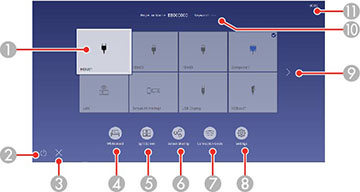
can select input sources and other frequently used options from the Home screen.
Note: A Touch Unit is optional for the BrightLink 1480Fi and must be installed to enable finger touch operation.
  1. To display the Home screen, do one of the following:
    • Press the Home button on the control panel or remote control.
    • Turn on the projector with the Home Screen Auto Disp setting enabled.
    • Turn on the projector when no signal is received from the selected input source.
  2. Press the arrow buttons on the remote control or control panel to navigate the screen, and press Enter to select an option. You can also select menu items using the interactive pen or your finger.


    1 Selects the source you want to project

    A checkmark appears in the upper right corner of the current input source. For most sources, a preview of the input image appears as a thumbnail.

    2 Turns off the projector
    3 Closes the Home screen
    4 Starts Whiteboard mode
    5 Projects images from two or four input sources simultaneously in a grid format
    6 Shares your projected image with other projectors connected to the same network
    7 Displays the Connection Guide

    You can view steps for different wireless connection methods depending on the devices you are using, such as smartphones or computers.

    8 Lets you select the following common projector settings (these settings may vary depending on other selected settings):
    • Color Mode
    • Brightness Level
    • Volume
    • Geometry Correction (H/V-Keystone and Quick Corner are available)
    • Auto Calibration
    • Aspect
    9 Moves to the previous or next page if there are more available input sources
    10 Displays the projector name and the projector keyword
    11 Displays the current time
    Note: The Home screen closes after 10 minutes of inactivity.
  3. Press the icon to close the Home screen.
Was this page helpful? Yes or No.
Privacy Policy | Your California Privacy Rights | Terms of Use