You can
control certain document camera features from the projected toolbar
when a compatible Epson document camera is connected.
Note: A
document camera toolbar is displayed only when an Epson DC-07,
DC-13, or DC-21 document camera is connected. You must connect the
Epson DC-13 and DC-21 cameras via HDMI and the Epson DC-07 camera
via USB to control them from the projector toolbar.
- Connect an Epson document camera to the projector.
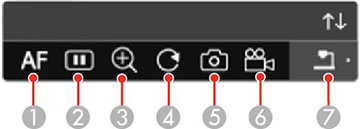
Note: If you are connecting the document camera via HDMI cable, make sure HDMI Link is set to On in the Signal I/O menu and disable PC Interactivity on the interactive toolbar.You see a toolbar like this at the bottom of the projected image. You can select the following options as available. Depending on your document camera model, options may vary.
1 Automatically focuses the image 2 Pauses the image 3 Enlarges the image 4 Rotates the image 180° 5 Captures the image and drawings 6 Records the image 7 Switches sources to the SD Card Viewer - To move the toolbar, use the pen or your finger to drag it
to the desired location.
Note: A Touch Unit is optional for the BrightLink 1480Fi and must be installed for finger touch operation.
- To minimize or expand the toolbar, select the
 icon.
icon.