You can scan
an original from the control panel using jobs created in Document
Capture Pro or Document Capture. Set the operation mode on the
control panel before scanning.
- Make
sure you installed the product software and connected the product
to your computer or network.
Note: You may need to restart your computer after installing the product software to enable scanning from the control panel.
- Place your original on the product for scanning. Make sure the feed selector on the scanner is in the correct position.
- Press the
 home button, if
necessary.
home button, if
necessary.
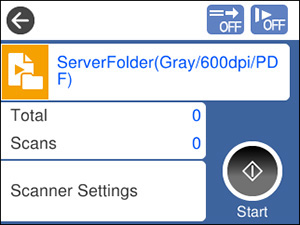
- Select Scan. You see a list of available scanning jobs. Each job represents a pre-defined set of scan settings.
- Select a
job.
Note: If you don't see an appropriate job, you will have to edit an existing job or add a new job using the Document Capture (Mac) or Document Capture Pro (Windows) application. See the link below.You see a screen like this:
- If you want to change the job settings
for the current job, select the job name. Any changes you
make will only apply until you exit the Scan screen. If you select
Scan again from the main menu, the
job is reloaded from the computer and your changes are lost. To
permanently modify a job, change the settings in Document Capture
or Document Capture Pro.
Note: If you cannot modify the settings, open Document Capture (Mac) or Document Capture Pro (Windows) and make sure the Disable job setting changes on control panel setting is not selected in the Confirm/Test tab in the job settings.
- Select from the following
options:
- To change the saved file type, select File Type and select a file type.
- To change the color type of the scanned image, select Image Type and select an option.
- To change the resolution, select Resolution and select an option from either Low (200 dpi), Medium (300 dpi), or High (600 dpi).
- To change the size of the scanned original, select Original Size and select an option.
- To scan both sides of the original, select Source and select 2-Sided.
- To change the number of copies to print when a printer is selected as the destination, select Copies and enter a number.
- If you want to change the scanner
settings for the current job, select Scanner Settings on the control panel.
Note: If an administrator has locked the settings, you may need to enter the administrator password to change certain scanner settings.
- Select
from the following options:
- To increase
the force used to separate originals in Delicate Mode, enable
Power Separation Mode (DS-32000).
Caution:Do not use Power Separation Mode with thin originals, or you may damage them.
- To slow down the scanning speed, set the Slow setting to On.
- To stop scanning immediately when a double feed is detected, set the Double Feed Stop Timing setting to Immediate. When set to After Eject, the double feed is scanned and ejected before scanning ends.
- To skip double feed detection when scanning originals such as envelopes or plastic cards, set the DFDS Function setting to On.
- To stop scanning immediately when a skewed original or feeding error is detected, enable the Paper Protection setting. When set to higher levels, the setting reduces the amount of skew required to trigger a stop. Select higher settings when scanning thin papers. Select Off when scanning plastic cards or thick paper. Lower the setting level if the scanner is too sensitive to paper skew.
- To detect dirt on the scanner glass, enable the Detect Glass Dirt setting.
- To use the ultrasonic sensor to detect double feed errors, enable the Ultrasonic Double Feed Detection setting. Enable this setting if you cannot enable double feed detection in your scanning software. This setting may not work with envelopes, plastic cards, or originals with labels or stickers.
- To increase
the force used to separate originals in Delicate Mode, enable
Power Separation Mode (DS-32000).
- Select the
 Start icon.