Adjust the
angle of the laser light coming from the Touch Unit so that the
Touch Unit can detect the position of your fingers. Once you have
performed Touch Unit Setup, perform touch calibration.
Note: You can
purchase a touch unit as an optional accessory or use a compatible
touch unit from an older projector. When using an older model of
the touch unit, angle adjustment is not automatic.
Note: Make
sure you have calibrated the pens, installed the Touch Unit, and
turned the Touch Unit on before performing setup. See the online
Installation Guide for Touch Unit
installation information and click the link below for pen
calibration instructions.
- Press the Menu button,
select the Installation menu, and
press
 Enter.
 - Select Touch Unit and
press
 Enter.
 - Select Touch Unit Setup
(Auto) and press
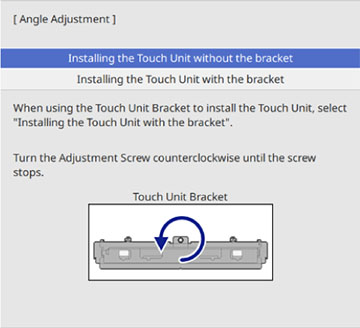
 Enter. The following screen
appears:
The projector automatically detects which touch unit model is
connected and displays the instructions for that model. The
instructions shown here are for the ELPFT01 touch unit.
 - Select the option for the Touch Unit installation method
that was used and press
 Enter.
 - If you are using the Touch Unit Bracket, turn the adjustment screw on the bracket counterclockwise until it stops.
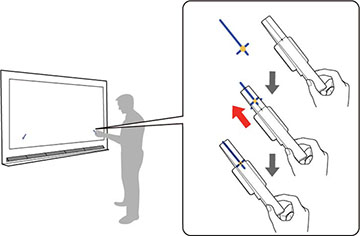
- Attach the two markers to the positions shown on the
projected screen making sure the thinner ends of the markers are
facing the Touch Unit.
Note: Do not place anything other than the markers near the projected image during angle adjustment. If other objects are on or near the projected image, angle adjustment may not be performed correctly.
- Move each marker over the projected cross until the lines
of the cross align with the lines on the marker. Make sure to match
the positions so that the crosses overlap with the points on the
marker positions.
Note: If the magnets won't attach to the screen completely, wipe the area to remove any dirt and try again. For non-magnetic screens, use the supplied tape to secure the markers.
- Press
 Enter on the remote control or control
panel to begin the auto adjustment.
- When adjustments are
complete, remove the markers.
Note: If auto adjustment fails, follow the instructions on the screen to manually adjust the angle of the laser and run Touch Unit Setup (Auto) again or run Touch Unit Setup (Manual).
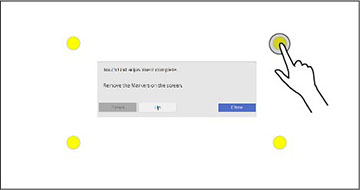
- Touch each of the four yellow circles on the screen and
verify that the gray touch indicator appears in the correct
position.
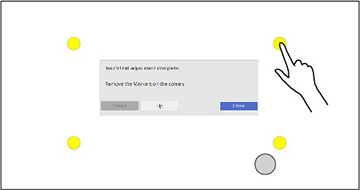
Note: Finger touch operations may not function correctly if you are wearing bandages, artificial nails, nail polish, or anything else that may obstruct your fingers.If the gray indicators do not appear where you touched the screen, you need to manually adjust the touch unit alignment.
- Select Up using the remote control or control panel
and press
 Enter. Try touching the four
dots again and repeat this process until the touch indicators
appear in the correct position.
 - When you are finished with adjustments, use the remote control to select Close.


