You can
manually adjust the angle of the laser light coming from the Touch
Unit so that the Touch Unit can detect the position of your
fingers. Once you have performed Touch Unit Setup, perform touch
calibration.
Note: You can
purchase a touch unit as an optional accessory or use a compatible
touch unit from an older projector. When using an older model of
the touch unit, angle adjustment is not automatic.
Note: Make
sure you have calibrated the pens, installed the Touch Unit, and
turned the Touch Unit on before performing setup. See the online
Installation Guide for Touch Unit
installation information and click the link below for pen
calibration instructions.
- Press the Menu button,
select the Installation menu, and
press
 Enter.
 - Select Touch Unit and
press Enter.
- Select Touch Unit Setup
(Manual) and press Enter.
- Select the option for the Touch Unit installation method
that was used and press Enter.
- If you are using the Touch Unit Bracket, turn the adjustment screw on the bracket counterclockwise until it stops. Otherwise, skip to step 9.
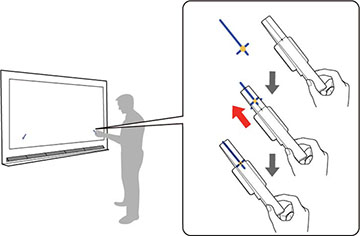
- Attach the two markers to the positions shown on the
projected screen, making sure the thinner ends of the markers are
facing the Touch Unit.
Note: Do not place anything other than the markers near the projected image during angle adjustment. If other objects are on or near the projected image, angle adjustment may not be performed correctly.
- Move each marker over the projected cross until the lines
of the cross align with the lines on the marker. Make sure to match
the positions so that the crosses overlap with the points on the
marker positions.
Note: If the magnets won't attach to the screen completely, wipe the area to remove any dirt and try again. For non-magnetic screens, use the supplied tape to secure the markers.
- If you are using the Touch Unit Bracket, turn the adjustment screw on the bracket to move the pointers into the targets. When the pointers are in the targets, they turn solid.
- If necessary, attach the two markers to the positions shown on the projected screen, making sure the thinner ends of the markets are facing the Touch Unit.
- Press 4 on the remote control until a pointer is displayed on the left side of the screen.
- Press 6 on the remote control until a pointer is displayed on the right side of the screen. If the pointer on the left side of the screen disappears when you are moving the pointer on the right side of the screen, press 7 on the remote control until the pointer on the left reappears.
- Press 4 and 6 on
the remote control to move the left and right pointers into the
targets.
Note: When you move one pointer, the other pointer also moves slightly. Adjust the pointers in alternating increments. If the pointers move past their targets, press 7 and 9 on the remote control to move the pointers in the opposite direction. If you cannot move the pointers as intended, press Esc on the remote control and start over.When the pointers are in the targets, they turn solid. When the left and right pointers are both solid, press Enter.
- Follow the on-screen
instructions to place the markers on the marker positions and check
the adjustment results. The corresponding circles turn solid
when the markers are placed on positions 1 and 2. If the
corresponding circles are not solid when the markers are placed,
return to step 1 and repeat the process. Otherwise, press
Enter.
- Remove the markers and then use your finger to trace the dots on the screen to erase them.
- When all of the dots have disappeared, use the remote control to select Complete. If any of the dots remain, select Additional Adjustment and follow the on-screen instructions to adjust again.