You can
install the optional printer stand as a base if the printer will be
placed on the floor. You must install the printer stand if you
install any optional paper cassettes.
- Turn off the product, and unplug the power cord and any
connected cables.
Warning: To avoid electric shock, make sure you unplug the power cord.
- Remove the printer stand from its packaging and remove any protective materials.
- Make sure you have all the items shown here:
1 Printer stand 2 Side stands (×2) 3 Side stand attachments (×2) 4 Front reinforcing bar 5 Rear reinforcing bar 6 Front cover 7 Side stand and reinforcing bar screws (×18) 8 Cabinet screws (×2) 9 Bracket screws (x2) 10 Rear brackets (x2) 11 Cable clamps (x2) - Place the stands between the printer stand's casters as shown.
- Secure the side stands to the printer stand using the side
stand attachments and the included screws.
Caution:Make sure the stands are securely attached or the product may fall over.
- Attach and secure the reinforcing bars to the stands using the included screws.
- Place the printer stand on the floor and lock the front casters.
- Attach the front cover to the stands as shown.
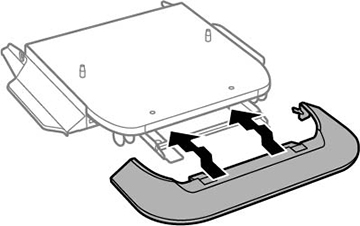
- Close the paper stopper on the output tray, if necessary, and push in the output tray. Lift and remove the output tray from the product.
- Unlock and open the ink pack tray cover.
- Press the black ink pack tray to release it, then pull the tray out and remove the paper cassette (C1).
- Lift up your product or optional cassette unit and gently
lower it onto the printer stand with the corners aligned. Secure
the product or optional cassette unit to the printer stand using
the included screws.
Note: Screws may be left over after installation.
- Secure the back of the product or optional cassette unit to the printer stand using the included brackets and screws as shown.
- Remove any seals from the
back of the product, and install the cable clamps in any of the
locations shown here.
Note: You can route the product's power cord or other connection cables through the clamps.
- Reinsert the black ink pack tray and close the ink pack tray cover.
- Reinsert the paper cassette you removed and reattach the output tray.
- Connect the power cord and other connection cables, then plug in the product.