You can scan
an image and save it to a network folder using your product's
control panel. You can either enter the folder path directly on the
product's control panel or select a folder from the Destination tab.
Note: Make
sure the date and time are set correctly before using this
feature.
- Place your original on the product for scanning.
Note: To scan a double-sided or multi-page document, place your originals in the ADF.
- Press the
 home button, if
necessary.
home button, if
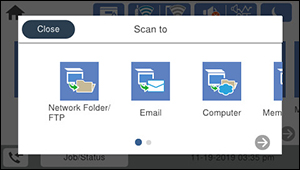
necessary. - Select Scan. You see a screen like this:
- Select Network Folder/FTP. You see a screen like this:
- Do one of the following:
- Select Scan Settings.
- Select File Format to choose the file format for your scan.
- Scroll down to select File Name and change it if necessary.
- Select any additional scan settings as necessary.
- Select Presets to save
your scan settings.
Note: Presets can be locked by an administrator. If you cannot access or change this setting, contact your administrator for assistance.
- Select
 Save. Your product scans your original
and saves it in the selected location.
Save. Your product scans your original
and saves it in the selected location.