Scanning Receipts and Using Receipt Manager

You can scan receipts and manage the data in Receipt Manager.
  1. Load your original receipts into the scanner.
  2. Press the  start button on the scanner. Epson ScanSmart automatically opens on your computer and the scan job begins. The receipts feed through the scanner. When scanning is complete, you see a screen like this:


  3. You can review or reorder the scanned images as follows:
    • Select + Scan to scan more receipts.
    • Select Delete to delete selected scanned images.
    • Select Rotate Right to rotate scanned images.
    • Select Crop to crop the selected image.
    • Select Stitch Images to combine two selected images into one image.
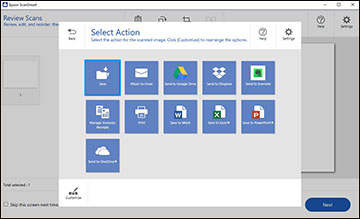
  4. When you are finished reviewing the scanned images, click Next. You see a screen like this:


  5. Click Manage Invoices/Receipts. You see a screen like this:


    Note: You can also click Manage Invoices/Receipts from the main Epson ScanSmart screen to begin scanning receipts.
  6. In the Edit window, review the receipt data against the scanned image and make sure it is correct. You can also choose the following options:
    • Select Scan & Add to scan more receipts.
    • Select Delete to delete selected scanned images. Make sure the blue checkbox in the receipt list is selected for the receipts you want to delete.
    • Select Combine to combine receipt data. Make sure the blue checkboxes in the receipt list are selected for the receipts you want to combine.
      Note: You cannot separate receipts once they are combined. You must delete and re-scan them if you need to separate them.
    • Select Duplicate to duplicate receipts. You can only duplicate one receipt at a time. Make sure the receipt you want to duplicate is selected.
    • Select Repeat OCR and select a language if the data fields were not populated.
      Note: Some fields may need to be entered manually.
  7. When you are finished reviewing the data for the first receipt, click Mark Reviewed. The next receipt appears and you can review the data. Repeat for each receipt.
    Note: Make sure the blue checkboxes in the receipt list are selected for the receipts you want to export or save.
  8. When you have finished reviewing data for all receipts, click Export and Save. You see a screen like this:


  9. Select an option. See the links below.
Related references
Characters are not Recognized During Conversion to Editable Text (OCR)