You can
create your web server certificate and import it using the
projector menus and a USB flash drive.
Note: You can
also register digital certificates from your web browser. Make sure
to only register once, or the certificate may not install
correctly.
- Make sure your digital certificate file is compatible with projector registration and saved in the root directory of the USB flash drive.
- Press the Menu button on the remote control.
- Select the Network menu and press
 Enter.
- Select the Network Configuration
setting and press Enter.
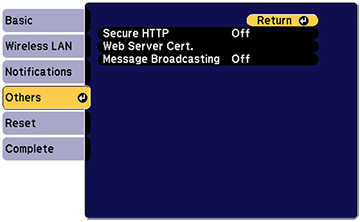
- Select the Others menu and press Enter.
- Select On as the Secure HTTP setting.
- Select the Web Server Cert. setting and press
Enter.
- Select Register and press Enter.
- Remove the screw securing the wireless LAN module port cover, then remove the port cover (Epson 880X and Home Cinema 880).
- Insert a USB flash drive into the projector's USB-A port. If the wireless LAN module is installed, remove it before inserting the USB flash drive.
- Press Enter to display the certificate list.
- Select the certificate you want to import from the displayed list. A message is displayed prompting you to enter the password for the certificate.
- Enter the password and
press Enter. The certificate is imported and
a completion message appears.
- Remove the USB flash drive, then re-insert the wireless LAN module (Epson 880X and Home Cinema 880).