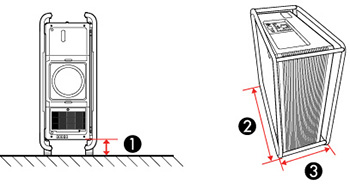
You can place the projector on almost any flat surface to project an image.
You can also install the projector in a ceiling
mount if you want to use it in a fixed location.
Warning: Note
the following points when installing on a ceiling with a ceiling
mount or in a high location. If installation work is not carried
out correctly, the projector could fall down. This may result in
injury or accidents.
- Since special techniques are required to install the projector on a ceiling and to handle the ceiling mount, make sure you contact a professional.
- Secure the mount with bolts using the handle securing section (6 points) on the top or base of the projector.
- To prevent the projector from falling, thread sufficiently strong wire rope and so on through the ceiling mount and secure to the ceiling.
Keep these considerations in mind as you select a
projector location:
- Place the projector on a sturdy, level surface or install it using a compatible mount.
- Install the projector at any angle. There is no vertical or horizontal limit to how the projector can be installed.
- Leave plenty of space around and under the projector for ventilation as described here, and do not place it on top of or next to anything that could block the vents.
- Place the projector parallel to the screen.
- Position the projector within reach of a grounded electrical outlet or extension cord.
Caution:
Be sure to leave at least 20 inches (50
cm) of space in front of the air exhaust and intake vents.
You can place the projector on its side to project a
portrait image by attaching the optional mounting handle to the top
of the projector. You can also remove the feet from the projector
and attach them to the handles as shown here.
Caution:
If you are installing multiple projectors next to each other, be sure to leave at least 20 inches (50 cm) of space between the projectors. Also, make sure heated air from an exhaust vent does not go into the air intake vent of another projector.
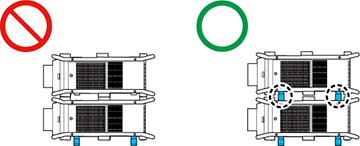
If you are stacking two projectors on top of one
another, follow these guidelines:
- Do not stack more than two projectors
- The bottom projector must have the carrying handles installed on the top of the projector
- Align the top projector so that its feet are in the indentations on the bottom projector shown here.
- Do not remove the feet on the bottom of the projector


