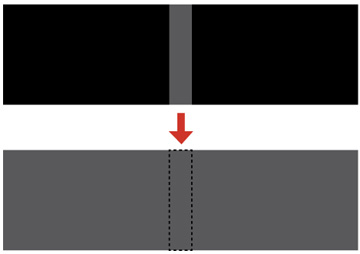
When
two images overlap, the overlapping area can appear differently
from the areas that do not overlap. You can use the projector's
Black Level setting to make the difference less noticeable.
Note: You
cannot adjust the black levels while projecting a test pattern, and
you may not be able to adjust the black levels correctly if the
Geometry Correction settings are
set too high. The brightness and tone of the overlapping areas may
differ from the rest of the image even after adjusting the black
level.
- Press the Menu button.
-
Select the Multi-Projection menu and press
 Enter.
-
Select the Black
Level setting and press Enter.
Note: The Black Level setting is displayed only if Edge Blending is enabled and at least one (top, bottom, left, right) edge is set to On.
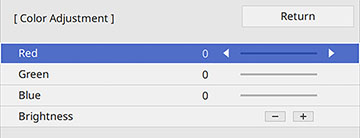
-
Select the Color
Adjustment setting and press Enter. You see a screen based
on the Top Edge, Bottom Edge, Right
Edge, and Left Edge
settings you selected for the Edge
Blending setting.
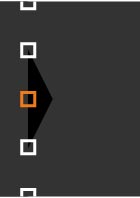
-
Select the area you want to adjust and press
Enter.
Note: The area you selected is displayed in orange. Adjust overlapping areas starting with the brightest areas first. For example, adjust area 2 to match area 1, then adjust area 3 to match area 2.
- Adjust the brightness and tone of the areas that do not overlap to match the areas that overlap using the displayed adjustment sliders. Then press the Esc button.
- Repeat the previous two steps as needed until all areas match.
- If the tone of some areas do not match, you can adjust them using the Area Correction setting. Continue with the next step. Otherwise, press the Menu button to exit.
- Press the Esc button to return to the Black Level screen.
-
Select the Area
Correction setting and press Enter.
-
Select the Start
Adjustments setting and press Enter. You see a screen with
boundary lines indicating areas that are overlapping. The boundary
lines are based on the Top Edge,
Bottom Edge, Right Edge, and Left Edge settings you selected for the
Edge Blending setting.
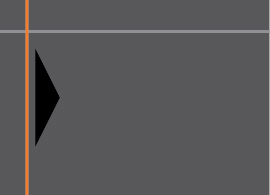
- Use the arrow buttons to
select a boundary line of the area you want to adjust and press
Enter. The selected line is
displayed in orange.
-
Use the arrow buttons to adjust the boundary
line position and press Enter.
-
Use the arrow buttons to select an adjustment
point and press Enter.
Note: You can change the number of adjustment points displayed by changing the Points setting in the Area Correction menu.The selected point turns orange.
- Use the arrow buttons to move the point.
- To move another point, press the Esc button and repeat the previous two steps.
- To move another boundary line, press the Esc button repeatedly until you can select a boundary line.
-
When you are finished, press the Esc button until you see a confirmation
message. Select Yes and press
Enter.
- When you are finished, press the Menu button.