You
can use the projector's Arc Correction setting to adjust the curve
or arc of the sides of your image.
- Turn on the projector and display an image.
- Press the Menu button.
-
Select the Settings menu and press
 Enter.
-
Select the Geometry Correction setting and press
Enter.
-
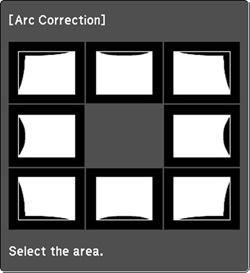
Select the Arc
Correction setting and press Enter. Then press Enter again. You see the Arc
Correction adjustment screen:
Note: To reset your adjustments, press the Esc button for at least 2 seconds to display a reset screen, and select Yes.
- Use the arrow buttons on the projector or the remote control to select the corner or side of the image you want to adjust. Then press Enter.
- Press the arrow buttons to adjust the image shape as necessary.
- When you are finished, press Esc.