You can
print ID photos from a memory card. Two copies of one photo are
printed at different sizes onto this size photo paper: 4 × 6 inches
(102 × 152 mm).
- Load photo paper in your product.
- Insert a memory card into your product's memory card slot.
- Press the
 home button, if
necessary.
Note: If Auto Selection Mode is turned on in the Guide Functions menu, select to function index when you see the information screen.
home button, if
necessary.
Note: If Auto Selection Mode is turned on in the Guide Functions menu, select to function index when you see the information screen. - Select Print Photos >
Collage > Print Photo ID.
Note: If you see a message telling you that loading photos is complete, select OK.
- Select any layout position
on the sheet. You see a screen like this:

- Select the photo you want to print then select Done.
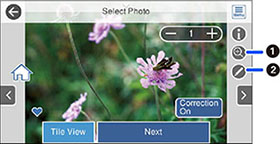
- If you need to edit a
photo, select Single View during
photo selection and press the left or right arrow button to scroll
to the photo you want to edit. You see a screen like this:
1 Lets you zoom in and out of the photo. 2 Lets you apply filters, make color and red-eye corrections, and adjust cropping, rotation, brightness, contrast, sharpness, and saturation if necessary. Note: Press the Correction On button again to switch between Correction Off and Correction On. With Correction On selected, any corrections you make to a photo are displayed on the screen. With Correction Off selected, any corrections you make will only be applied to your printouts. - Confirm the layout and select Next.
- Select your paper and print settings as necessary.
- Select Copies to change the number of copies as necessary.
- When you are ready to
print, press the Print
icon.
Note: To cancel printing, select Cancel and select Close to exit.