Make sure
you have your replacement cartridges handy before you begin. You
must install new cartridges immediately after removing the old
ones.
Caution:
Leave your old cartridges in the product
until you are ready to replace them to prevent the print head
nozzles from drying out. Do not open ink cartridge packages until
you are ready to install the ink. Cartridges are vacuum packed to
maintain reliability.
Note: If you
remove a low or expended ink cartridge, you cannot re-install and
use the cartridge.
- Turn on your product.
- If an ink cartridge is expended, you see a message on the LCD screen. Note which cartridges need to be replaced and follow the on-screen instructions or the instructions below to replace the cartridge.
- If you are
replacing a cartridge before you see a message on the LCD screen,
press the
 home button if necessary, and
select Maintenance >
Ink Cartridge Replacement. Select
Next and select Start.
home button if necessary, and
select Maintenance >
Ink Cartridge Replacement. Select
Next and select Start.
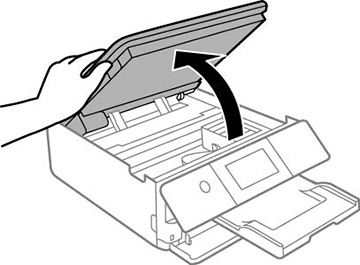
Note: You can also select How To to view ink replacement instructions on the LCD screen. - Lift up the scanner unit.
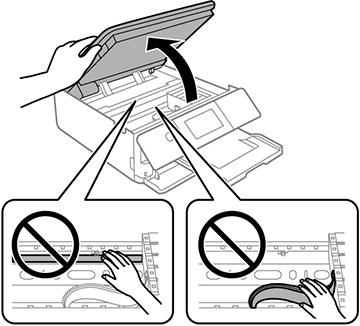
Caution:Be careful not to trap your hand or fingers when opening or closing the scanner unit.The ink cartridge holder moves to the replacement position. If the ink cartridge holder returns to the home position (far right), repeat steps 1 and 2.Caution:
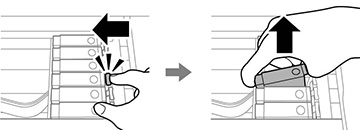
- Push in the blue tab to unlock the ink cartridge you are
replacing. Then lift the ink cartridge as shown to remove
it.
Warning: If ink gets on your skin, wash it thoroughly with soap and water. If ink gets into your eyes, flush them immediately with water. If discomfort or vision problems persist, see a doctor immediately. If ink gets into your mouth, spit it out and see a doctor right away. Keep ink cartridges out of the reach of children.Note: Replace ink cartridges one after another as quickly as possible. If you replace two or more cartridges at a time or replacement takes time, some ink may be consumed to guarantee printer performance.Caution:Be careful not to let dust or any objects get inside the ink cartridge holder. Anything inside the holder may adversely affect the printing results or result in an inability to print.
- Recap the used ink cartridge using the cap that came with
it. You can also use the cap from your replacement cartridge
package.
Note: Dispose of used cartridges carefully. Do not take the used cartridge apart or try to refill it.
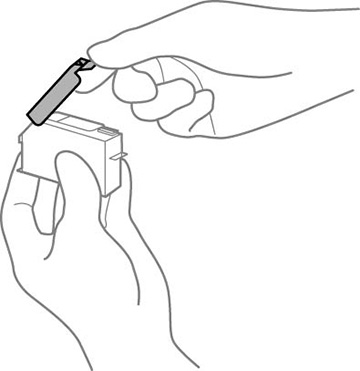
- Remove the new ink cartridge from the package.
Caution:Do not drop or shake the ink cartridges. Do not squeeze them or tear their labels; doing so may cause the ink cartridge to leak.
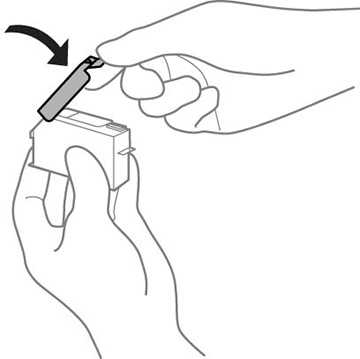
- Remove the cap from the
cartridge and save the cap so you can recap ink cartridges before
storing or disposing of them.
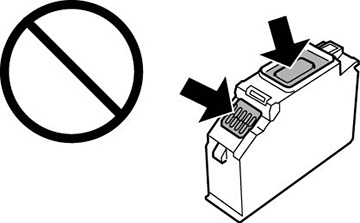
Caution:Do not remove any other labels or seals, or the ink cartridge may leak or become unusable. Do not touch the areas shown here; doing so may prevent normal operation and printing.
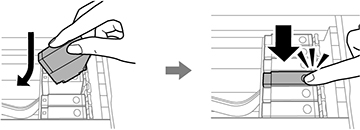
- Insert the new cartridge into the ink cartridge holder at an angle as shown. Then push it all the way down until it clicks into place.
- After you replace all the
cartridges that need replacing, lower the scanner unit and select
Completed on the LCD
screen.
Note: The scanner unit is designed to close slowly as a precaution against trapping fingers. Continue to close the scanner unit even if you feel some resistance.The print head moves to its home position and the product starts charging the ink. This takes a few minutes. When you see a completion message on the LCD screen, ink replacement is complete.Note: If you see an error screen telling you an ink cartridge is installed incorrectly, lift up the scanner unit and press the ink cartridge down until it clicks into place. When you're finished, close the scanner unit.


Caution:
Do not turn off the product while ink is
charging or you may not be able to print.
Caution:
If you remove an ink cartridge for later
use, recap the ink cartridge using the cap that came with it to
prevent the ink from drying out and to protect the surrounding area
from getting smeared by ink. Store the ink cartridge in the same
environment as the product. Do not leave the product with the ink
cartridges removed for an extended period of time. Otherwise, ink
remaining in the print head nozzles may dry out and you may not be
able to print.