You can
load thin or fragile originals in the scanner using a carrier sheet
(not included). Make sure the original meets the loading
specifications before scanning it.
Note: If you are
using a carrier sheet, the product cannot automatically detect the
width of the original. If you are copying the original, set the
Original Size setting to the size of
your original. If you are scanning the original, set the
Scan Size setting to the size of
your original or the Top Offset
setting to 0.75 inches (19 mm).
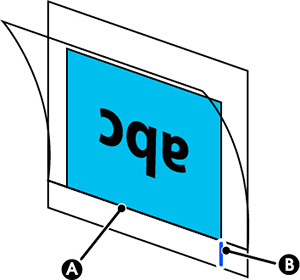
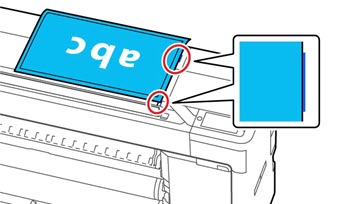
- Insert the original into the carrier sheet with the printed side facing the transparent sheet. Align the top edge of the original with the top of the carrier sheet (A) and align the side of the original with the alignment mark (B).
- Insert the carrier sheet against the right side of the scanner slot.
When you are done scanning,
remove the original.
Notes on Using the Carrier Sheet
When scanning using a carrier sheet, the paper color
(background color) of the document may be visible in the scan
results, or wrinkle shadows may appear. To address these concerns,
you can try making adjustments in the Remove Background setting according to the
scanning method used.
- When copying: Select Copy > Advanced > Image Quality > Remove Background > Auto > Off, and adjust the value between -4 to 4.
- When scanning and saving to an email or folder: Select Scan , and then select Email or Network Folder/FTP depending on the target location. Select Scan Settings > Image Quality > Remove Background > Auto > Off, and adjust the value between -4 to 4.
- When saving scanned data to an external memory device: Select Scan > To Memory Device > Advanced > Image Quality > Remove Background > Auto > Off, and adjust the value between -4 to 4.