- Open a document for printing.
- Select the print command in your
application.
Note: You may need to select a print icon on your screen, the Print option in the File menu, or another command. See your application's help utility for details.
- If necessary, select your product name
as the printer you want to use.
Note: You may also need to select Preferences, Properties, Print Settings, or Printer Properties to view your print settings.You see the Printer Settings window:
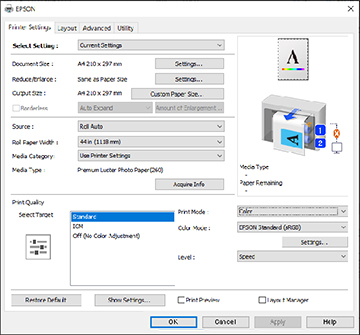
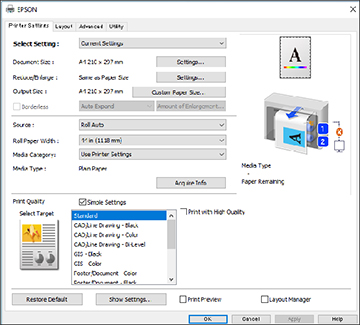
SureColor T7770D
- Select the Current Settings option.
- Click Settings to select the Document Size setting that matches the size of
the digital document you are printing.
Note: The Document Size should be set before selecting an Output Size.
- Click Settings to select the Reduce/Enlarge setting for the image according
to the paper size.
Note: If you select Fit to Output Size, you can select a different output size. If you select Same as Paper Size, the Document Size and Output Size settings are the same.
- If you want your printout to be a
different size than the selected document size, select the
Output Size setting. Make sure to
select a paper size that is larger than the selected document size
or enlargement setting.
Note: Select Custom Paper Size to set a user-defined output size.
- If you are printing a borderless
photo, select Borderless. You can
select Amount of Enlargement to
access additional options for borderless printing.
Note: You must select a compatible borderless paper type and size to print without borders. Check the borderless paper compatibility list for details.
- Select the Source setting that matches the paper source you
want to use.
Note: If you select a roll paper option, select the width of the roll as the Roll Paper Width setting.
- Select the Media Category setting that matches the paper
you loaded.
Note: If you want to use paper settings that have been set in the printer's control panel, select Use Printer Settings.Note: Click Acquire Info to refresh the settings if you loaded or changed paper after opening the print window.
- Select the Media Type setting that matches the paper you
loaded.
Note: Click Acquire Info to refresh the settings if you loaded or changed paper after opening the print window.
- Choose from the following to select
the print quality:
- SureColor P8570D: Select Select Target. Select the Print Mode, Color Mode, and Level settings as necessary.
- SureColor T7770D: If you want
the printer driver to determine print settings based on the
document type, select the Simple
Settings checkbox. Deselect the checkbox if you want to
select your own color correction, print mode, or other settings. If
you want to prioritize quality over print speed, select the
Print with High Quality checkbox.
Note: If you deselect the Simple Settings checkbox, available options depend on the selected Select Target setting. To choose a setting for each option, select Custom as the Select Target setting.
- To see a preview of how your document will print, select Print Preview. (The preview appears after you click Print but before printing starts.)
- To layout multiple print data or images for printing all at once, select Layout Manager.