Turn
on the projector before you turn on the computer or video equipment
you want to use.
Note: When
first powering on the projector, it is important to set the date
and time when prompted. The date and time must be set to use the
scheduling function, and ensures that any warnings or errors are
recorded accurately for troubleshooting.
- Connect the power cord to
the projector's power inlet.
Note: For the EB-PU2120W/EB-PU-2220B models, a 220 V power cord is required for full operation and performance, however, you can use a 120 V power cord to temporarily operate the projector in order to assist with projector setup. When projecting using a 120 V power cord (not included), the brightness of the projected image is approximately 60% of the brightness when using a 220 V power cord. Use the 220 V power cord when adjusting the projected image or the lens. You cannot use the Light Source Mode, Estimated Remains, Refresh Mode, or Light Source Calibration features with the 120 V power cord. When using a 120 V power cord, it should have a 3-prong plug, a 14 AWG rating and a C19 connector.Note: Be sure to ground the power plug using a ground wire or 3-core power plug.
-
Plug the power cord into an electrical
outlet. The projector's On/Standby light turns blue. This indicates that the
projector is receiving power.
Note: With Direct Power On turned on, the projector turns on as soon as you plug it in. If you enable the Auto Power On setting in the projector's Operation menu, the projector turns on when it detects a signal or cable connection from the selected port.
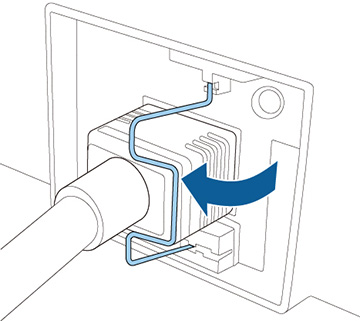
- If necessary, lock the power cord to prevent it from falling out.
-
Press the On button on the projector or remote control
to turn on the projector.
The projector beeps and the Status light flashes blue as the projector warms up. After about 30 seconds, the Status light stops flashing and turns blue.Note: When Quick Startup is enabled in the projector's Operation menu, the projector becomes ready for use in several seconds the next time you press the On button.Warning: Never look into the projector lens when the laser is on. This can damage your eyes and is especially dangerous for children and pets. If you are using the remote control to turn the projector on, make sure no one is looking into the lens or in front of the projector before turning it on.Caution:Make sure no objects are blocking the light from the projector lens. Objects blocking the lens for an extended time can melt and light that is reflected back into the lens can cause the projector to malfunction.

If you do not see a projected image right away, try
the following:
- Turn on the connected computer or video device.
- Insert a DVD or other video media and press the play button, if necessary.
- Press the Source Search button on the projector or the Search button on the remote control to detect the video source.
- Press the button for the video source on the remote control.
- If the Home screen is displayed, select the source you want to project.