If the print
quality has not improved after aligning the print head and cleaning
the paper guide, the print head path inside the product may be
smeared with ink.
To clean the print head path, use the
following:
- Several cotton swabs
- ¼ cup (59 ml) water containing 2 to 3 drops of mild dish detergent
- A small flashlight
Caution:
Do not use any other liquid to clean the
print head path or you may damage your product.
- Turn off the product.
- Lift up the scanner unit until it clicks.
Caution:Be careful not to trap your hand or fingers when opening or closing the scanner unit.
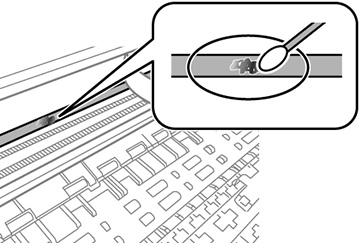
- Using the flashlight, check the translucent film shown
here for ink smears.
1 Translucent film 2 Print head rail Caution:Do not touch the print head rail; otherwise, you may not be able to print. Do not wipe off the grease on the rail. - Moisten a cotton swab with the water and detergent mixture
and squeeze out any excess moisture. Use it to lightly wipe ink off
the translucent film.
Caution:Do not press too hard on the film or you may dislocate the anchor springs and damage the product. Do not touch the ink that has adhered inside the product.
- Use a new, dry cotton swab to dry the translucent
film.
Note: Do not leave any fibers on the translucent film. To prevent the smear from spreading, frequently replace the cotton swab with a new one.
- Repeat steps 4 and 5 as necessary to clean all ink smears.
- Visually inspect the film to make sure there are no smears.
- When the translucent film
is dry, close the scanner unit.
Note: The scanner unit is designed to close slowly to avoid catching fingers in the printer. There may be some resistance when closing the scanner unit.