- Make sure no product lights are
indicating errors.
- Load a few sheets of plain paper in the product.
- Hold down the
 stop button for five seconds to start the cleaning cycle. The
 power light flashes throughout
the cleaning cycle and stays on when the cleaning cycle is
finished.
Caution:Never turn off the product or open the front cover during a cleaning cycle or you may not be able to print.
power light flashes throughout
the cleaning cycle and stays on when the cleaning cycle is
finished.
Caution:Never turn off the product or open the front cover during a cleaning cycle or you may not be able to print. - Run a nozzle check to confirm that the print head is
clean.
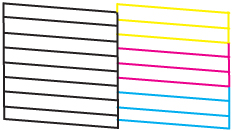
Print head is clean
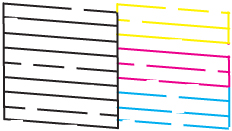
Print head needs cleaning
Print head needs Power Cleaning
- Do one of the
following:
- If there are no gaps, the print head is clean and you can continue printing.
- If there are gaps or the pattern is faint, clean the print head.
- If almost the entire pattern is missing, see the link below for instructions on performing a Power Cleaning.