If you have
a WPS-enabled wireless router or access point, you can use Wi-Fi
Protected Setup (WPS) to connect your product to the network.
- Press the
 home button, if
necessary.
home button, if
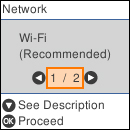
necessary. - Select Wi-Fi Setup. You see a screen like this:
- Select Wi-Fi (Recommended).
- Press the OK button to proceed.
- Select Push Button Setup (WPS).
- Press the OK button to proceed.
- Follow the instructions on the LCD screen to complete WPS setup.
- Press the home button to exit. If
the network connection is successful, the
 icon is displayed on the Wi-Fi
Setup screen and should be able to connect to your product directly
from your computer or device, and then print. If you are printing
from a computer, make sure you installed the network software as
described on the Start Here sheet.
icon is displayed on the Wi-Fi
Setup screen and should be able to connect to your product directly
from your computer or device, and then print. If you are printing
from a computer, make sure you installed the network software as
described on the Start Here sheet.