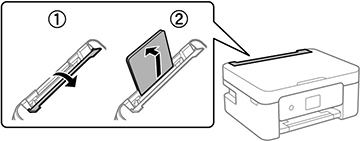
- Flip the feeder guard forward, then raise the paper support.
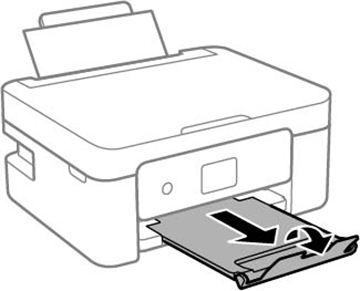
- Pull out the output tray and open the paper stopper.
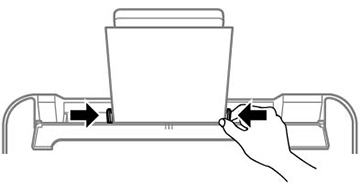
- Slide the edge guides out all the way.
- If you are inserting a stack of paper, fan the sheets
first and tap the stack on a flat surface to even the edges.
Note: Do not fan or curl photo paper.
- Do one of the following:
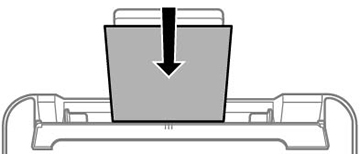
- Insert paper, glossy or printable side up and short edge first, in the center of the rear paper feeder.
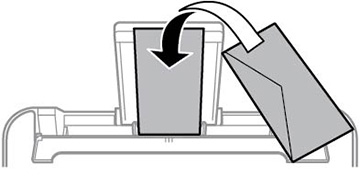
- Load up to 10 envelopes in the center of the rear paper feeder. Load them printable side up, short edge first, and flap facing down.
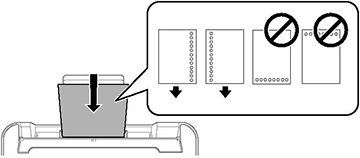
- Load a sheet of loose-leaf or other paper with holes facing as shown. Load paper in the center of the rear paper feeder and printable side up.
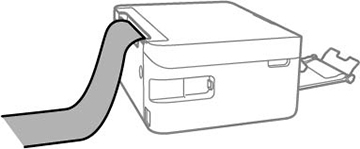
- To load a sheet of paper longer than legal size, close the paper support and flatten the leading edge of the paper as shown. Select User-Defined as the paper size setting.
- Slide the edge guides against the paper, but not too
tightly.
If prompted by the product, select the size and type of the paper
you loaded.
Note: If you are printing on letterhead, make sure you select Letterhead as the paper type. Make sure you select the correct paper size setting. For letterhead paper, if you print on paper that is smaller than the setting in the printer driver, the printer may print beyond the edges of the paper which can lead to ink smears on your printouts and excess ink building up inside the printer. Borderless printing and 2-sided printing are not available for letterhead paper. Printing on letterhead may be slower.

Always follow
these paper loading guidelines:
- Load only the recommended number of sheets.
- Do not load paper above the arrow mark inside the edge guides.
- If the paper is curled, flatten it or curl it slightly in the opposite direction before loading. Printing on curled paper may cause paper jams and smears on the printout.
- Do not use papers that are wavy, torn or cut, folded, damp, have stickers, or are too thick or too thin.
- Fan and align the edges of envelopes before loading.
- If you have trouble loading a stack of envelopes, press each envelope flat before loading it or load one envelope at a time.
- Do not load envelopes that are curled, folded, or too thin, or that have plastic windows or exposed adhesive flaps.
- Paper feed problems may occur frequently for manual 2-sided printing when printing on one side of pre-printed paper. Reduce the number of sheets to half or less, or load one sheet of paper at a time if paper jams continue.
- For pre-punched paper, load a single sheet of defined-size plain paper with holes at the left or right. Adjust the print position of your file to avoid printing over the holes. Automatic 2-sided printing is not available for pre-punched paper.
- For paper longer than Legal size, make sure the end of the paper is cut perpendicularly. A diagonal cut may cause paper feed problems. Long paper cannot be held in the output tray. Prepare a box or tray to make sure that paper does not fall on the floor. Do not touch paper that is being fed or ejected. It could injure your hand or cause print quality to decline.
- Check the paper package for any additional loading instructions.
- If you use paper with binder holes, load only one sheet at a time in only these sizes: Letter (8.5 × 11 inches [216 × 279 mm]), A4 (8.3 × 11.7 inches [210 × 297 mm]), or Legal (8.5 × 14 inches [216 × 356 mm]).