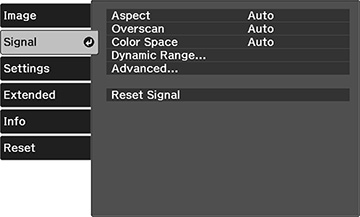
Normally the projector detects and optimizes the input signal settings automatically. If you need to customize the settings, you can use the Signal menu. The available settings depend on the currently selected input source.
To change settings for an input source, make sure the source is connected and select that source.
| Setting | Options | Description |
|---|---|---|
| Aspect | See the list of available aspect ratios | Sets the aspect ratio (width-to-height ratio) for the selected input source |
| Overscan | Auto
Off 4% 8% |
Changes the projected image ratio to make the edges visible by a selectable percentage or automatically |
| Color Space | Auto
BT.709 BT.2020 |
Sets the conversion system for the color space (set to Auto for most cases) |
| Dynamic Range | Dynamic Range | Changes the range of dark and bright areas in the image (set to Auto for most cases) |
| Signal Status | Displays the detected input signal | |
| HDR10 Setting | Adjusts the PQ curve of the dynamic range (available when Dynamic Range or Signal Status is set to HDR10) | |
| HLG Setting | Adjusts the HLG curve of the dynamic range (available when Dynamic Range or Signal Status is set to HLG) | |
| Advanced | Video Range | Sets the video range to match the setting of the device
connected to the HDMI input port
Auto: detects the video range automatically Limited: for images from a device other than a computer; can also be selected if the black areas of the image are too bright Full: for images from a computer; can also be selected if the image is too dark |
| EDID | Selects EDID settings
Normal: supports 3840 × 2160 30Hz signals 21:9: supports 2560 × 1080 60Hz signals |
|
| Image Processing | Improves the response speed for images projected at
high speed
Fast: increases image processing speed Fine: increase image quality |
|
| Reset Signal | — | Resets all adjustment values on the Signal menu to their default settings. |