You can load
paper up to Legal (8.5 × 14 inches
[216 × 356 mm]) in the paper cassettes and
the rear paper tray.
- To view animated
instructions on how to load paper in the rear paper tray or paper
cassettes, press the
 help button and select
How To > Load Paper. Select a paper source and paper
type.
help button and select
How To > Load Paper. Select a paper source and paper
type.
- If you are loading
pre-punched paper, glossy paper, envelopes, or long paper in the
rear paper tray, do one of the following:
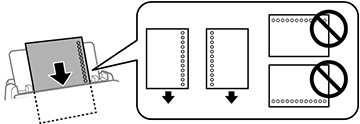
- Load one sheet of pre-punched paper, short edge first as shown.
- Load sheets of paper with their glossy or printable side visible.
- Load up to 10 envelopes, short edge first with the flap facing down and to the left
- Load long paper by allowing the paper to roll over as shown. Select the user-defined setting as the paper size setting.
- Set the paper size and
type on the LCD.
Note: If you do not want to display the paper settings screen when you load paper, set the Settings > General Settings > Printer Settings > Paper Source Settings > Paper Setup Auto Display setting to Off.

Always follow
these paper loading guidelines:
- Load only the recommended number of sheets.
- Load paper short edge first, no matter which way your document faces.
- Load letterhead or pre-printed paper top edge first.
- Do not load paper above the arrow mark inside the edge guides.
- Check the paper package for any additional loading instructions.
Caution:
Do not load the following papers; they
may cause paper jams, smears on the printout, or damage to the
printer.
- Papers that are wavy or damp
- Papers that have not dried after printing on one side
- Papers that are wadded or curled
- Papers that are torn, cut, or folded
- Papers that are too thick or thin
- Pre-printed papers printed by other inkjet printers, thermal transfer printers, page printers, or copiers
- Papers that are perforated
- Papers that have stickers
- Papers held together with tape, staples, or paper clips
- Envelopes with adhesive surfaces or windows