Once you
have connected your projector to your network, you can select
projector settings and control projection using a compatible web
browser. This lets you access the projector remotely.
Note: The web
setup and control features support Microsoft Edge, Google Chrome,
and Safari on networks that do not use a proxy server for
connection. You cannot select all of the projector menu settings or
control all projector functions using a web browser.
Note: If you
set Standby Mode to Communication On in the Operation menu, you
can use a web browser to select settings and control projection
even if the projector is in standby mode (the power is off). The
Standby Mode setting is displayed
only if the A/V Output setting in
the Signal I/O menu is set to While
Projecting.
- Make sure the projector is turned on.
- Start your web browser on a computer or device connected to the network.
- Type the projector's IP
address into the browser's address box and press the computer's
Enter key (if you are entering an
IPv6 address, wrap the address with [ and ]).
Note: You can find the projector's IP address in the projector's Network menu or on the LAN input screen.Note: If you attempt to connect to the Web Control screen via a proxy server, the screen will not be displayed. Make a direct connection to the Web Control screen.Caution:Do not remove the USB flash drive from the projector or disconnect the projector's power cord when the Playlists or USB Memory Device screens are displayed in Content Playback mode (EB-L260F/EB-L265F). Data saved on the flash drive may be damaged.You see a Web Control screen like this.
In normal mode:
In Content Playback mode (EB-L260F/EB-L265F):
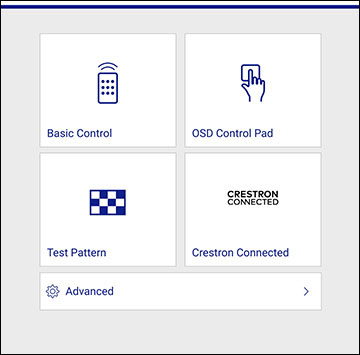
Note: To disable this mode, set Content Playback to Off in the Operation menu. - To control projection remotely, select the Basic Control option from the Web Control
screen.
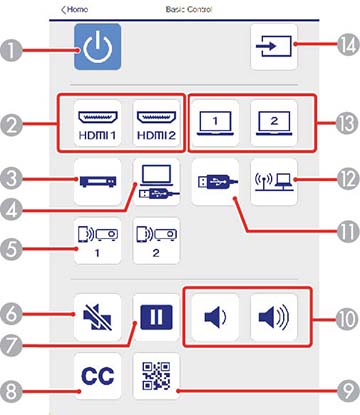
Note: The system may prompt you to set other passwords that have not yet been set.Note: If you see a log in window, enter your user name and Remote Password. (The default user name is EPSONREMOTE. You can change the Remote Password using the projector's Network Settings menu.)You see a screen like this:
1 Power button control 2 Selects an HDMI port source 3 Selects the Video port source 4 Selects the USB Display source 5 Selects the Screen Mirroring source 6 A/V Mute button control 7 Freeze button control 8 Closed captioning control (not available in all countries) 9 Displays a QR code for connecting with iOS or Android devices using the Epson iProjection app 10 Volume button controls 11 Selects the USB device source 12 Selects the network source 13 Selects a Computer port source 14 Searches for connected sources - Select the icon corresponding to the projector function you want to control.
- To select projector menu
settings, select Advanced on the
Web Control screen.
Note: The system may prompt you to set other passwords that have not yet been set.Note: If you see a log in window, enter your user name and Web Control Password. (The default user name is EPSONWEB. You can change the Web Control Password using the projector's Network Settings menu. If you are prompted to set a Monitor Password, enter a password up to 16 characters long and then select Apply.)
- Select the name of the menu and follow the on-screen instructions.