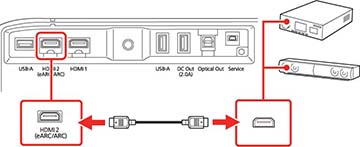
Connecting to an eARC/ARC Compatible AV System

If your external speakers or A/V receiver are HDMI ARC-compatible, you can connect them to the projector's HDMI2 (eARC/ARC) port using an optional HDMI cable. Make sure the HDMI CEC setting is enabled and then enable HDMI2 ARC. In the projector's Sound menu, set Sound Output Device as ARC or eARC. Connecting this way bypasses the projector's speakers and enables you to adjust the speaker's volume with the projector's remote control.  
Note: If you want to output higher quality audio, set Sound Output Format as Auto in the projector's Sound menu.
Note: Connecting to an eARC compatible system requires a high-speed HDMI 2.0 (with Ethernet) cable or better. The audio format is determined by the specifications of the connected AV system or external audio device such as a soundbar.
  1. Connect the HDMI cable to the eARC/ARC-compatible HDMI port on your external speakers or A/V receiver.
    Note: To display signals in the 18 Gbps transmission band, such as from a 4K 60 fps source, use a cable rated for HDMI 2.0 or higher or you may have trouble displaying an image.
  2. Connect the other end to the HDMI2 (eARC/ARC) port on the rear of the projector.


  3. Select any HDMI control settings on the connected speakers or receiver, as necessary. See your device's documentation for more information.
eARC/ARC Supported Audio Format
  • LPCM: 2ch (Max 48kHz/24bit)
  • Dolby Digital (AC-3)
  • Dolby Digital Plus
  • Dolby Atmos (eARC only)
  • DTS
Related references
Projector Feature Settings - Settings Menu
Sound Quality Settings - Sound Menu