Select the copying options you want to use for your copies.
Note: Not all
options or settings may be available, depending on other copying
settings.
Basic Settings
| Copying option | Available settings | Description |
|---|---|---|
| Auto | — | Copies the document in the detected color of the
original.
Note: You can
adjust the detection sensitivity from the home screen (Settings > General Settings > System Administration > Copy Color Sensitivity). |
| B&W | — | Copies the document in black and white. |
| Color | — | Copies the document in color. |
| Density | Varying levels | Adjusts the lightness or darkness of copies. |
| Paper Setting | Various sources | Select the paper source that you want to use. If you select Auto, paper is fed automatically depending on the paper settings you selected for the paper sources. |
| Reduce/Enlarge | Auto | Automatically sizes the image to fit the paper size you selected. |
| Reduce to Fit Paper | Automatically decreases the size of the image by the percentage you select. | |
| 100% | Displays the conversion percentage. Use the + and - icons to adjust the percentage in increments of 1 or select the value and use the on-screen keypad to enter a percentage. | |
| Free Form (mm) | Specifies the size of the target paper in millimeters. | |
| Free Form (%) | Specify different magnifications for the vertical and horizontal lengths of the original to enlarge or reduce it. | |
| Actual Size and other conversions | Copies the original at its full size or automatically converts from one size to another. | |
| Various paper sizes | Automatically enlarges or reduces the original to fit a specific paper size | |
| Original Type | Text | Specifies the document type of your originals and adjusts the quality of your copies. |
| Text & Image | ||
| Photo | ||
| Barcode | ||
| 2-Sided | 1>1-Sided | Select to make 2-sided copies. When you select 1>2-Sided or 2>1-Sided, you can select the orientation and binding edge for your originals or copies. |
| 2>2-Sided | ||
| 1>2-Sided | ||
| 2>1-Sided | ||
| Multi-Page | Single Page | Copies each page of the original onto an individual sheet. |
| 2-up | Copies multiple page documents onto one sheet. Scroll down and select the document orientation and layout order settings as necessary. | |
| 4-up | ||
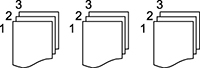
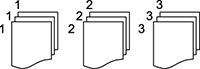
| Finishing | Collate (Page Order) | Select to print multiple copies of a multi-page document in ordered sets. |
| Group (Same Pages) | Select to print multiple copies of a multi-page document in unordered groups. |
Advanced settings
| Copying option | Available settings | Description |
|---|---|---|
| Cover & Slip Sheet | Cover | Adjust these settings to add covers to your copies. |
| Slip Sheet | Adjust these settings to insert slip sheets into your copies. | |
| Original Size | Various sizes | Select the document size of your original. |
| Mixed Size Originals | Off | Select On to copy originals of varying sizes in their original sizes. |
| On | ||
| Orientation (Original) | Readable Direction | Specifies the orientation of your originals. |
| Left Direction | ||
| Book>2Pages | Off | Select On to copy two pages of a book onto separate sheets of paper. You can also choose the Scan Order. |
| On | ||
| Continuous Scanning | Off | Select On to scan a large quantity of originals placed in the ADF as one job. |
| On | ||
| Image Quality | Various settings | Select advanced quality settings such as Saturation and Sharpness. |
| Binding Margin | Off | Select On to adjust the margin and orientation of the pages when copying a book. You can also select the Binding Position and Orientation. Select Binding Width to shift the image out of the binding margin, Reduce to Fit Paper to shrink the image to fit into the printing area, or Erase Image Over Margin to only print the part of the image that is outside of the binding margin. |
| On | ||
| Reduce to Fit Paper | Off | Select On to automatically decrease the image by the percentage you select. |
| On | ||
| Remove Shadow | Off | Select On to erase the shadows that appear in the center of a document when copying a book or that appear around a document when copying thick paper. |
| On | ||
| Remove Punch Holes | Off | Select On to erase the binding holes on a document. You can also select the Erasing Position and Orientation. |
| On | ||
| ID Card Copy | Off | Select On to copy both sides of an ID card onto one side of a sheet of paper. You can also select the Orientation. |
| On | ||
| Proof Copy | — | When making multiple copies, you can start with one copy to check the results, and then copy the rest. |
| Stamp | Stamp | Select On to print stamps on your copies. |
| Type | Select the stamp type. | |
| Stamp Position | Select the stamp position. | |
| Print Page | Select the page you want to stamp. | |
| Size | Select the stamp size. | |
| Print Color | Select the stamp color. | |
| Transparency | Select whether the stamp is transparent. | |
| Date Stamp | Date Stamp | Select On to print date stamps on your copies. |
| Date Format | Select the date format. | |
| Stamp Position | Select a location for the date stamp. | |
| Size | Select a size for the date stamp. | |
| Background | Select whether or not to make the date stamp's background white. If you select White, you can see the date stamp clearly when the background for the data is not white. | |
| Page Numbering | Page Numbering | Select On to print page numbers on your copies. |
| Format | Selects the page numbering format. | |
| Stamp Position | Selects where the page number is placed on each copy. | |
| Change Numbering | Specifies on which page numbering begins. | |
| Size | Adjusts the font size of the page numbers. | |
| Background | Adjusts the background color of the page number. | |
| File Storing | — | Select On to save the copied file to the product's internal storage. Adjust the save settings, including whether to print and save the copied file or to only save the file. |
| Print Sets | Various settings | Allows you to copy the document in groups of saved quantities and settings. |
| Erase Red Color | Off | Select On to print copies with any red characters in the original omitted. |
| On |
Booklet settings
| Copying option | Description |
|---|---|
| Booklet | Allows you to create a booklet from your copies |
| Binding | Select the binding position of the booklet |
| Binding Margin | Specify the binding margin up to a maximum of 50 mm in 1 mm increments |
| Cover |
Allows you to add covers to the booklet |
| Paper Setting | Select the paper source in which you loaded the paper for the covers |
| Front Cover | Specify the print settings for the front cover. If you do not want to print on the front cover, select Do not Print |
| Back Cover | Specify the print settings for the back cover. If you do not want to print on the back cover, select Do not Print |