To prevent
colored T-shirt fibers on the roller from sticking to other
T-shirts, use a different roller for each color.
Note: Apply
approximately 0.5 ounces (15 grams) of pre-treatment solution to
printing areas of letter-/A4-size. Do not apply too much
pre-treatment liquid; otherwise, the print quality may decline.
Depending on the properties of the T-shirt material, traces
of the pre-treatment solution may be visible after fixing the ink
if the solution was applied using a roller. If this happens, try
applying the pre-treatment solution with a machine
instead.
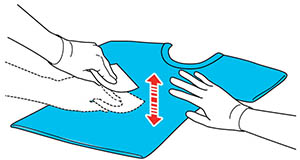
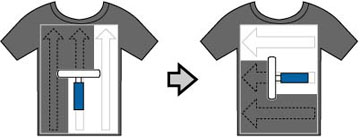
- Use sticky tape (or a lint roller) to remove lint from the area where you will apply the pre-treatment solution.
- Apply the solution evenly in both directions as shown to an area larger than the target print area. It is important to finish in the shoulder-to-shoulder direction; this aligns the fabric fibers to the direction of the print head movement.