|
|
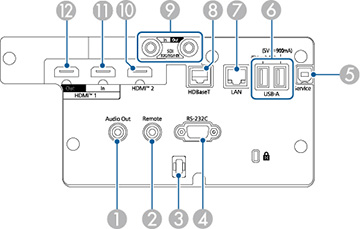
Name |
Function |
| 1 |
Audio Out port
(Stereo pin mini jack) |
Outputs audio
from the current input source to an external speaker. You can also
connect the projector to an amplifier with speakers.
To output audio from the speaker connected to this
port, select Projector as the
Audio Out Device setting in the
projector's Settings menu. When
an audio/video system is not connected to the projector, audio is
output from the speaker connected to this port even if Audio Out Device is set to A/V System.
- Settings >
HDMI Link > Audio Out Device
If you want to output audio for the HDMI source from
the external speakers when the projector is turned off,select
Always On as the A/V Output setting in the projector's
Extended menu.
- Extended >
A/V Settings > A/V Output
|
| 2 |
Remote port
(Stereo pin mini jack) |
Connects the
remote control to the projector using the optional remote control
cable set and inputs signals from the remote control. When the
remote control is connected, the remote receiver on the projector
is disabled. |
| 3 |
Cable
holder |
Pass a
commercially available cable tie through here to secure the cables.
Warning: Do
not bundle the power cord to the other cables. Otherwise, a fire
may occur. |
| 4 |
RS-232C port
(Mini D-Sub 9-pin, male) |
Use to
connect an RS-232C cable to control the projector from a
computer |
| 5 |
Service port
(USB connector Type B) |
Used for
batch settings and firmware update. |
| 6 |
USB-A port
(USB connection Type A) |
Use to
connect a USB memory device for projecting movies or images in
Content Playback mode. It is also used for batch settings and
firmware update.
Use to connect the optional camera when using the
optional ultra short-throw zoom lens.
Provides a connection for a streaming media player to
power it.
This projector can be powered at 5 V/2 A or 5 V/
900mA.
Caution:
- Use the USB cable supplied with or specified for use
with the device.
- Do not connect a USB hub or a USB cable longer than
three meters, or the device may not operate correctly.
|
| 7 |
LAN port
(RJ-45) |
Use to
connect a LAN cable to connect to a network.
Use a 100Base-TX or 10Base-T network cable.
To ensure proper data transmission, use a Category 5
shielded cable or better. |
| 8 |
HDBaseT port
(RJ-45) |
Use to
connect a LAN cable to the optional HDBaseT Transmitter. You can
use a network cable up to 330 ft (100 m) in length. To ensure
proper data transmission, use a Category 5e STP cable or better.
However, operation is not guaranteed for all input/output devices
and environments.
This port is compatible with HDCP2.3.
Check the following settings:
|
| 9 |
SDI In port
(BNC) |
(EB?PQ2010B/EB?PQ2010W only)
Inputs video signals from SDI-compatible video
equipment.
|
| 9 |
SDI Out port
(BNC) |
(EB?PQ2010B/EB?PQ2010W only)
Outputs video signals input from the SDI In port to an external monitor. You can
connect two projectors in a daisy chain using an SDI cable. If you
want to output images to an external monitor when the projector is
turned off, select Always On as
the A/V Output setting in the
projector's Extended menu.
Extended >
A/V Settings > A/V Output
Note: When using 12G-SDI, use a cable that
supports 12G-SDI.
Make sure the cable you are using is as short as
possible. Images may not display correctly when using a long
cable.
|
| 10 |
HDMI2 port |
Inputs video
signals from HDMI compatible video equipment and computers.
Connects the optional base unit of the Epson Wireless
Presentation System.
This port is compatible with HDCP2.3. (Audio is only
supported by PCM) |
| 11 |
HDMI1 In port
(HDMI) |
Inputs video
signals from HDMI compatible video equipment and computers.
Connects the optional base unit of the Epson Wireless
Presentation System.
This port is compatible with HDCP2.3. (Audio is only
supported by PCM) |
| 12 |
HDMI1 Out port
(HDMI) |
Outputs
signals to an external monitor or another projector.
Connecting an HDMI cable from this port to the
HDMI1 In port of another
projector lets you create and project a single unified image.
We recommend connecting to a projector of the same
model.
This port is compatible with HDCP2.3. |