- Open a photo or document for printing.
- Select
the print command in your application.
Note: You may need to select a print icon on your screen, the Print option in the File menu, or another command. See your application's help utility for details.
- If
necessary, select your product name as the printer you want to
use.
Note: You may also need to select More settings, Properties, or Preferences to view your print settings.
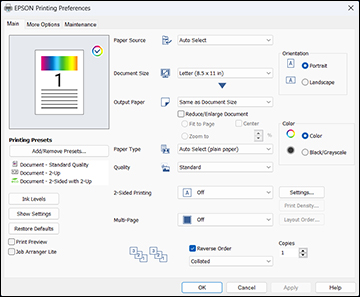
- For the Paper Source setting, select where you loaded the paper you want to print on. Select Auto Select to automatically select the paper source in the paper setting menu on the product.
- Select
the size of your document or photo as the Document Size setting, and the size of your
paper as the Output Paper
setting.
- To change the size of your printed document or photo, select the Reduce/Enlarge Document checkbox.
- Select the Fit to Page option to size your image to fit the paper you loaded.
- Select the Center checkbox if you want to center your image on the paper.
- Select the Zoom to option to reduce or enlarge your document or photo by a specific percentage. Select the percentage in the % dropdown.
- Select
the type of paper you loaded as the Paper
Type setting. Select Auto Select
(plain paper) to automatically use the paper type selected
on the product control panel.
Note: The setting may not exactly match the name of your paper. Check the paper type settings list for details.
- Select the Quality setting that matches the print quality you want to use.
- Select
the orientation of your document.
Note: If you are printing an envelope, select Landscape.
- Select a Color option:
- To print on both sides of the paper, select a 2-Sided Printing option and click Settings to select printing options.
- To print multiple pages on one sheet of paper, or print one image on multiple sheets of paper, select one of the Multi-Page options and click Layout Order to select the printing options.
- To print multiple copies and arrange their print order, select the Copies, Reverse Order, and Collated options.
- To preview your job before printing, select the Print Preview checkbox.
- To save your print job as a project that can be modified and combined with other print jobs, select Job Arranger Lite.