Note:
The printer tracks amounts consumed using the replacement counter
and displays a message when the counter reaches the warning level.
If you replace the head maintenance set according to the message,
the counter is cleared automatically. If you replace it before the
message is displayed, make sure to initiate replacement from the
printer's menu ( Maintenance > Replace Maintenance Parts > Head Maintenance Set). Otherwise, the
replacement counter will not operate correctly.
Maintenance > Replace Maintenance Parts > Head Maintenance Set). Otherwise, the
replacement counter will not operate correctly.
- Do one of the following:
- Replace
all of the parts of the head maintenance set in the following
order:
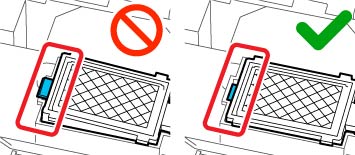
Caution:Lift the flushing pad carefully as ink could spray out if it is raised with too much force. After replacing the flushing pad, make sure that it is installed correctly. If the hooks are raised when printing, the print head could be damaged.
 Note: You cannot print if the parts are not replaced.