Since
pre-treatment machine models may vary in operation and controls,
you should consult the pre-treatment machine documentation.
Warning: Depending
on the type of sprayer used, the machine may create a mist when
applying the pre-treatment solution. Wear a mask, protective
eyewear, and gloves, and make sure the area is well ventilated. The
solution mist could also enter the printer and cause a malfunction
or damage the product. If necessary, install the pre-treatment
machine in a location away from the printer.
Note: Apply
approximately 0.5 ounces (15 grams) of pre-treatment solution to
printing areas of letter-/A4-size. Do not apply too much
pre-treatment liquid; otherwise, the print quality may
decline.
- Pour the
diluted pre-treatment solution into the pre-treatment machine as
directed by the manufacturer.
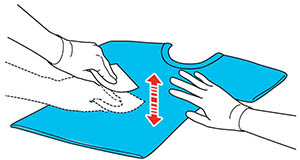
- Spread out the T-shirt on a flat
surface.
- Use sticky tape (or a lint roller) to
remove lint from the area where you will apply the pre-treatment
solution.
- Place
the T-shirt on the pre-treatment machine platen.
- Set the
controls to adequately cover the desired printed area with
pre-treatment solution. (On 1 to 100 dial controls, this may be 30
to 45.) We recommend applying the pre-treatment solution to an area
larger than the target print area.
Note: You can
apply the solution evenly by running the roller over the treated
area.
- Fix the
pre-treatment solution with a heat press with parchment (silicone)
paper.
Note: The T-shirt
fibers must be pressed flat to produce even whiteness. If you use a
heat tunnel to fix the ink, use a heat press for a short period of
time at high pressure to flatten the T-shirt fibers before
printing.