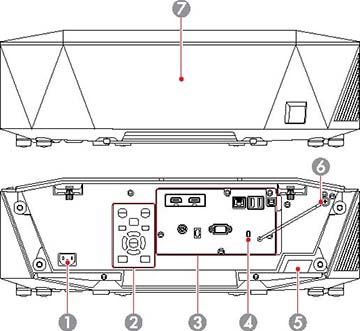
Projector Parts - Rear


1 AC power inlet Connects the power cord to the projector
2 Control panel Operates the projector
3 Interface ports Connects interface cables
4 Kensington security slot The security slot is compatible with the Microsaver Security System manufactured by Kensington.

For more details on the Microsaver Security System,visit the Kensington Web site.

5 Remote receiver Receives signals from the remote control
6 Vanity board fall prevention wire Secures the vanity board to the projector
7 Cable cover Cover for the rear interface ports

Interface ports


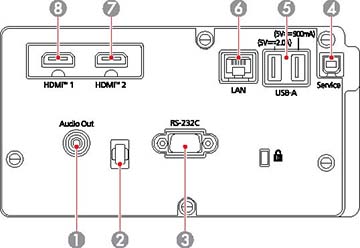
Note: Check the shape and orientation of the connectors on any cable you plan to connect. Do not force a connector into a port if it does not fit; the device or your projector could be damaged or could malfunction. Do not turn on the input source before connecting it to the projector. Doing so could damage the projector. If necessary, use an adapter to connect to an input port on the projector.
  Name Function
1 Audio Out port

(Stereo pin mini jack)

Outputs audio from the current input source to an external speaker. You can also connect the projector to an amplifier with speakers.

To output audio from the speaker connected to this port, select Projector as the Audio Out Device setting in the projector's Settings menu. When an audio/video system is not connected to the projector, audio is output from the speaker connected to this port even if Audio Out Device is set to A/V System.

  • Settings > HDMI Link > Audio Out Device
2 Cable holder Pass a commercially available cable tie through here to secure the cables.
Warning: Do not bundle the power cord to the other cables. Otherwise, a fire may occur.
3 RS-232C port

(Mini D-Sub 9-pin, male)

Use to connect an RS-232C cable to control the projector from a computer
4 Service port

(USB connector Type B)

Used for batch settings and firmware update.
5 USB-A port

(USB connection Type A)

Use to connect a USB memory device for projecting movies or images in Content Playback mode. It is also used for batch settings and firmware update.

Provides a connection for a streaming media player to power it.

This projector can be powered at 5 V/2 A or 5 V/ 900mA.

CAUTION:
  • Use the USB cable supplied with or specified for use with the device.
  • Do not connect a USB hub or a USB cable longer than three meters, or the device may not operate correctly.
6 LAN port

(RJ-45)

Use to connect a LAN cable to connect to a network.

Use a 100Base-TX or 10Base-T network cable.

To ensure proper data transmission, use a Category 5 shielded cable or better.

7 HDMI2 port Inputs video signals from HDMI compatible video equipment and computers.

Connects the optional base unit of the Epson Wireless Presentation System.

This port is compatible with HDCP2.3. (Audio is only supported by PCM)

8 HDMI1 port

(HDMI)

Inputs video signals from HDMI compatible video equipment and computers.

Connects the optional base unit of the Epson Wireless Presentation System.

This port is compatible with HDCP2.3. (Audio is only supported by PCM)

Note: When sending 40 Gbps images such as 4K 120Hz, use an HDMI cable (ultra-high speed). If you use an incompatible cable, images may not be displayed correctly. If images are not displayed correctly, you may be able to display them correctly by changing the EDID Mode setting in the projector's Signal menu.

Control panel


1 On button Turns the projector on
2 Source Search button Changes to the next input source
3 Menu button Displays and closes the projector's menu.
4 Enter button Enters the current selection and moves to the next level while displaying the projector's menu
5 /Left arrow button Displays the Control Panel Lock screen allowing you to lock the control panel buttons.
Do one of the following to unlock them:
  • Set the Control Panel Lock setting to Off
  • Hold down the Enter button on the control panel for more than seven seconds.
Selects menu items while displaying the projector's menu.
6 /Down arrow button Displays the Test Pattern screen.

Selects menu items while displaying the projector's menu.

7 Shutter button

Turns the video and audio on or off temporarily (A/V Mute).

The projector's power automatically turns off two hours after A/V Mute is enabled.

You can disable this feature.
  • Extended > Operation > A/V Mute Settings > A/V Mute Timer
8 Lens button Displays the adjustment screens for lens shift, zoom, focus, and distortion in that order each time the button is pressed. Wait 20 minutes after turning on the projector before setting the focus, zoom, and lens shift for maximum accuracy.

When adjusting the image position using vertical lens shift, adjust it by moving the image from the bottom to the top. If you adjust it from the top to the bottom, the image position may move down slightly after adjusting.

Hold down the button for more than three seconds to move the lens position to the home position. Keep the lens position in the home position for the clearest picture.

9 Right arrow button Displays the projector's Info menu.

Selects menu items while displaying the projector's menu.

10 /Up arrow button Corrects the shape of the image using the options in the Geometry Correction setting.

Selects menu items while displaying the projector's menu.

11 Esc button Stops the current function.

Moves back to the previous menu level while displaying the projector's menu.

12 Standby button Turns the projector off