- Perform Cleaning (Recommended) to clean at the appropriate intensity. Even if the nozzles are not unclogged after one cleaning, you can continue performing Cleaning (Recommended).
- When you want to choose the intensity, perform Cleaning (Light) or Cleaning (Heavy).
- Perform Ink Circulation Cleaning (White) when the white in the printed results is lighter than past jobs or when the white is uneven.
- Select
 maintenance > Head Cleaning on the control panel.
 - Select a cleaning method.
- Select All Colors or
Select Colors.
- For All Colors, go to step 5.
- For Select Colors, go to the next step.
- Print
the nozzle check pattern, select the colors for cleaning, and then
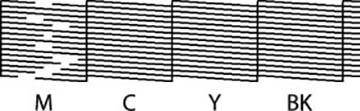
press OK. The text printed on the
bottom of the nozzle check pattern indicates the combination of ink
color and nozzle row. Check which rows are missing in the nozzle
check pattern, and then select Color, White, or
Varnish as the color to clean.
Select Color when M, C, Y, or BK is
missing. For the situation shown in the following illustration,
select Color.
- Check the message and press Start to begin cleaning. After cleaning, select Yes and then print a nozzle check pattern to ensure that any clogs have been cleared.
- If clogging is cleared, you are done. If the clogging is
not cleared, check the following:
-
If you used the Cleaning (Recommended) option, repeat it. If the nozzle check pattern is not clear after multiple cycles, wait up to 12 hours without using the printer, then print a a nozzle check pattern again. If the nozzle check pattern still has gaps, repeat the Cleaning (Recommended) cycle. If the problem persists, contact Epson support.
- If you use the Cleaning (Light) option, perform the Cleaning (Heavy) cycle. If the clogging is unresolved after multiple Cleaning (Heavy) cycles, leave the printer for 12 hours without printing, and then print a nozzle check pattern. If the clogs are not cleared, repeat the Cleaning (Light) cycle. If the problem persists, contact Epson support.
-