- Set up the product to automatically print a check pattern during or between each print job. You can select how often the product performs a nozzle check in the Information Printing menu.
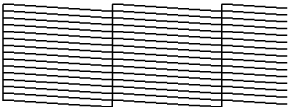
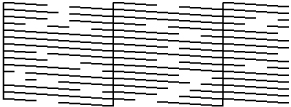
- Manually run a nozzle check from the product control panel, as described here.
Note:
Depending on the width of the loaded media, you can save media by
printing additional check patterns in the space beside an existing
pattern. To print them in line, press the  rewind button to rewind the
media to the position where you want to print the pattern.
rewind button to rewind the
media to the position where you want to print the pattern.
- If the media width is 51 to 64 inches (1,295.4 to 1,625.6 mm), you can print up to three patterns (one on the left, one in the center, and one on the right).
- If the width is equal to or greater than 34 inches (863.6 mm) but less than 51 inches (1,295.4 mm), you can print up to two patterns (one on the left and one on the right).
- If the width of the media is less than 34 inches (863.6 mm), you cannot print side by side.