- When the Width Detection setting
is turned on, your product automatically detects the left and right
edges of the media within 0.2 inches (5 mm), as long as
the media edge guides are attached correctly.

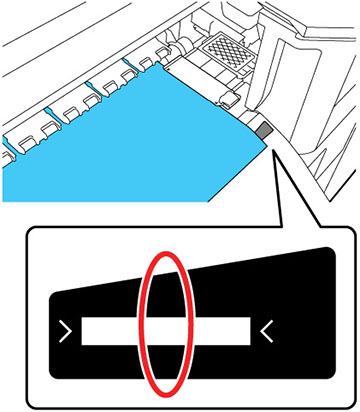
- When the Width Detection setting
is turned off, your product uses the longest scale on the after
heater label shown as the standard position for the right edge of
the media. The left edge of the media is determined to be
64 inches (1626 mm) from the standard position for the
right edge, no matter the width of the loaded media. The printable
area ranges for the media are described in the table that
follows.
Note: If you turn off the Width Detection setting, printing may occur outside the edges of your media, causing ink to stain the product. Make sure your print data width does not exceed the loaded media width. When you load media to the left of the right side reference position, adjust the Print Start Position setting on the product control panel to match the position where the media is loaded.
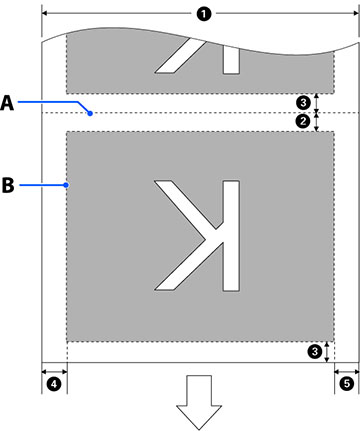
In the illustrations below, the white arrow indicates the feeding direction, A marks the media cut position, and B marks the printable area.
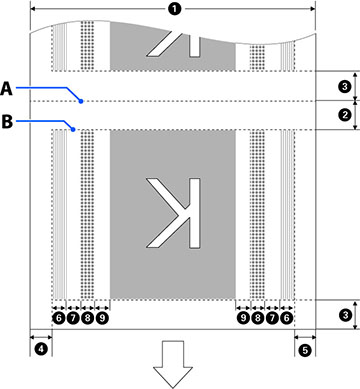
When using the Information Printing function
As shown below, the size of the left and right sides of the image print area is reduced by the amount of information to print.
Areas for printing information vary according to the settings. Below is an example of the smallest image print area when Left and Right is selected for Event Marking and Nozzle Check Pattern in the Information Printing function.
| 1 | Media width
11.8 to 64 in. (300 to 1,626 mm); if Width Detection is off, the product assumes this is 64 inches (1,626 mm) regardless of the actual width |
| 2 | Bottom
margin1
This is half the value selected for Margin Between Pages in the printer's settings menu. To maintain media feeding accuracy, if the settings are less than 0.39 in. (10 mm), the settings are switched to 0.19 in. (5 mm). You can select from 0 to 39.33 in. (0 to 999 mm) for the Margin Between Pages setting. |
| 3 | Top
margin1, 2
This is half the value selected for Margin Between Pages in the printer's settings menu. If the settings are less than 0.39 in. (10 mm), the settings are switched to “the setting -5.” You can select from 0 to 39.33 in. (0 to 999 mm) for the Margin Between Pages setting. |
| 4 | Right
margin3, 4
This is the total of the values selected for the Print Start Position and Side (Right) settings. The default setting for Print Start Position is 0 mm and the default setting for Side (Right) is 0.19 inch (5 mm). You can set this margin from 0.11 to 40.35 in. (3 to 1,025 mm). |
| 5 | Left
margin3, 4
This is the value selected for the Side (Left) setting. The default setting is 0.19 in. (5 mm). You can set this margin from 0.11 to 0.98 in. (3 to 25 mm). |
| 6 | Nozzle check
pattern printing width
0.62 in. (16 mm) if Normal is selected for Pattern Selection 0.15 in. (4 mm) if Paper Width Saving is selected |
| 7 | Space between
nozzle check patterns and Event Marking
Fixed to 0.11 in. (3 mm) |
| 8 | Event Marking
width
Fixed to 0.78 in. (20 mm) |
| 9 | Space between
nozzle check patterns and Event Markings and the image
When Print Position is set to Next to the Image, the margin on the right side of the image represents the value selected for Margin Between Images. When it is set to Media End, the value varies according to images and other settings. You can set this space from 0 to 39.33 inches (0 to 999 mm). |
1 The configured margin and the actual print results may differ depending on the RIP software you use. Contact the RIP manufacturer for more information.
2 When you set the Width Detection setting on the product control panel, you can adjust the margin from –0.39 inch (–10 mm) to 0.39 inch (10 mm).
3 Depending on the RIP software, you may be able to use it to set these margins. Contact the RIP manufacturer for more information.
4 When using the media edge guides, leave margins of at least 0.39 inch (10 mm) to avoid printing over them. If the total of the print data width and left and right margins exceeds the printable area, a portion of the print data will not print.