Click the Advanced tab on the top of the printer settings window to select Advanced options.
|
1.
|
Select the paper type setting that matches the paper you loaded.
|
|
•
|
Economy: for fast printing with reduced print quality
|
|
•
|
Fast Economy: for the fastest printing with draft print quality
|
|
•
|
Draft: for fast printing with draft print quality
|
|
•
|
Normal: for everyday text and image printing
|
|
•
|
Fine: for text and graphics with good print quality and speed
|
|
•
|
Photo: for photos and graphics with good print quality and speed
|
|
•
|
You can load paper in these sizes and select the size in the printer software. (Wider papers are for use only when reducing large images with the Reduce/Enlarge Document option.) User Defined and Custom options are also available so you can create a custom size.
Half Letter (5.5 × 8.5 inches)
Envelope #10 (4 1/8 × 9 1/2 inches)
|
4.
|
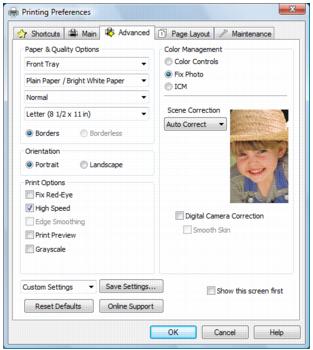
If you’re printing borderless photos, click the Borderless checkbox. For documents or photos with borders, select Borders.
|
|
5.
|
Choose Portrait or Landscape orientation for your document or photo. (Choose Landscape for envelopes.)
|
|
•
|
Select Print Options
|
|
•
|
Fix Red-Eye: reduces or removes red-eye in photos
|
|
•
|
High Speed: speeds up printing, but may reduce print quality
|
|
•
|
Edge Smoothing: prints sharper edges on low-resolution images, such as bars in a graph
|
|
•
|
Print Preview: lets you preview how your document or photo will look when printed
|
|
•
|
Grayscale: for printing documents in shades of gray
|
|
•
|
Select Color Management options
|
|
•
|
Color Controls: let you select a Color Mode. Click Settings to adjust Brightness, Contrast, Saturation, Density, and individual Cyan, Magenta, and Yellow color tones.
|
Color Mode: when using Color Controls, selects the main method of printing colors for photos and graphics; EPSON Standard, EPSON Vivid or AdobeRGB.
Gamma: when using Adobe RGB, adjusts the midtone density in the print.
|
•
|
Fix Photo: automatically analyzes your photos and, if necessary, adjusts the brightness, contrast, and saturation. You can select Scene Correction and choose Auto Correct, People, Landscape, Night Scene, Sepia, or Gray. Additional options let you select settings for Digital Camera Correction and Smooth Skin.
|
Note:
Fix Photo (or Auto Photo Correction) uses a sophisticated face recognition technology to optimize photos that include faces. For this to work, both eyes and the nose must be visible in the subject’s face (without sunglasses). If your photo includes a face with an intentional color cast, such as a statue, you may want to turn off Fix Photo to retain the special color effects.
Fix Photo (or Auto Photo Correction) uses a sophisticated face recognition technology to optimize photos that include faces. For this to work, both eyes and the nose must be visible in the subject’s face (without sunglasses). If your photo includes a face with an intentional color cast, such as a statue, you may want to turn off Fix Photo to retain the special color effects.
|
•
|
ICM: lets you select No Color Adjustment to use only the color adjustments provided by your printing program.
|
|
•
|
Save all your selected settings for later use (click Save Setting and name the settings); to use saved settings later, select them from the Custom Settings list or from the Shortcuts tab
|
|
•
|
Return to the default settings (click Reset Defaults)
|