![]()
User's Guide
|
|
Index |
|
Help |
|
Safety | |||||
|
|
Contents |
|
||||||||
|
|
|
|||||||||||||||||||||||||||||||||
Tips for Administrator / Settings for NetWare Users
Follow the steps below to make the printer environment using NWAdmin under NetWare 4.x, IntranetWare, NetWare 5.x, or NetWare 6.0 with NDS mode.
 | From any NetWare client, log in to the target context of the NDS tree as an ADMIN. |
 | Run the Administrator tool (NWAdmin). |
 | Create a printer: |
Click the directory context icon, and select Create from the Object menu, then Printer. Type the Printer name and click Create.

 | Create a print server: |
Click the directory context icon, and select Create from the Object menu, then Print Server. Type the Print Server name and click Create.

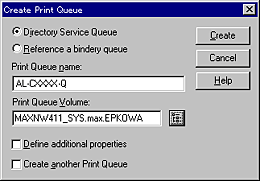
 | Create a print queue: |
Click the directory context icon, and select Create from the Object menu, then Print Queue. Type the Print Queue name and select the Print Queue Volume, then click Create. Double-click the print queue object, and register the user.
| Note: |
|
 | Double-click the Printer Object icon in the NetWare Administrator screen. |

 | In the Printer dialog box appears, click Assignments and then click Add. |

 | From the print queue list, select the queue you created in step 5 and click OK. |
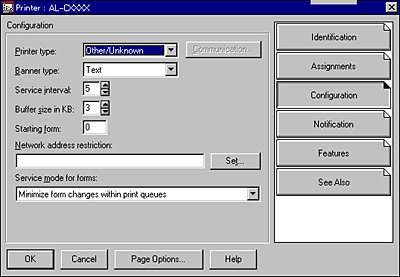
 | Click Configuration, and select Other/Unknown for the Printer type list box and click OK. |
 | Double-click the Print Server Object icon in the NetWare Administrator screen. |

 | In the Print Server dialog box that appears, click Assignments and then click Add. |
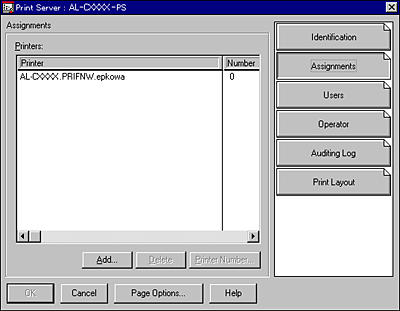
 | From the printer object list, select the printer object you want to assign and click OK. |
 | Go back to the screen in step 11, and click the Printer Number button to set the printer number from 0 to 254. |

 | To confirm the objects you have assigned, double-click the Print Server object icon. Click Print Layout, and check that the print server, printer, and print queue are connected. |
|
| Turn on the device. |
|
|
Load the print server from the file server's system console which the print queue volume is set. >LOAD PSERVER print server name you set using NWAdmin |
|
| Configure the network interface using EpsonNet Config. See the EpsonNet Config User's Guide for details. |
If you use the NetWare objects that are already created, you can use EpsonNet Config with Web Browser too. See NetWare for details.
 Previous |
 Next |
| Version 1.00E, Copyright © 2003, SEIKO EPSON CORPORATION |