- Make sure the EPSON Stylus CX5400 is turned on and not printing, and the Error light is off.
- Load a stack of plain, letter-size paper in the sheet feeder.
- Press the left Menu button until you see Head Alignment, then press the Color Copy button to print the first alignment page.
- On the test page, select the pattern with the two vertical lines most precisely printed on top of each other. You may need to use a magnifying glass or loupe.
- Press the + or - Value buttons to select the number of the best pattern for the first row, then press the Color Copy button. Repeat this step for the second, third, fourth, and fifth rows.
- When you're finished, press the Color Copy button to print the second alignment sheet.
- On the test page, select the pair of horizontal bars with the least noticeable light or dark band between them. You may need to use a magnifying glass or loupe.
- Press the + or - Value buttons to select the number of the best pattern, then press the Color Copy button. (In this example, pattern 4 is best.)
- When you're finished, press the Color Copy button to print the third alignment sheet.
- Repeat steps 7 through 8 to complete the alignment process.
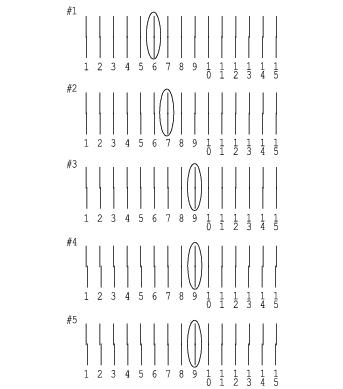
Select one pattern each for rows 1, 2, 3, 4, and 5. (In this example, the best pattern in each row has been circled.)
Note: If you select a pattern other than 8 in any row, that pattern becomes pattern #8 the next time you align the print head.
