Before you start, make sure the Epson Stylus CX7000F Series all-in-one is set up, its software is installed, and it is connected to your computer as described on the Start Here sheet.
Whenever you print, make sure you tell the CX7000F Series what kind of paper you’re using. See Selecting the Correct Paper Type for details.
Note:
The type of paper you choose affects the way your printout looks, so be sure to select the correct paper for your job. If you are just making a copy or printing a rough draft of an image, plain paper is fine. However, for the best results, you’ll want to use one of Epson’s special ink jet papers designed for your printer. For example, your photos will look great printed on Epson Ultra Premium Photo Paper Glossy. You can purchase genuine Epson ink and paper online at www.epsonstore.com (U.S. sales) or www.epson.ca (Canadian sales). See Special Papers for more information.
The type of paper you choose affects the way your printout looks, so be sure to select the correct paper for your job. If you are just making a copy or printing a rough draft of an image, plain paper is fine. However, for the best results, you’ll want to use one of Epson’s special ink jet papers designed for your printer. For example, your photos will look great printed on Epson Ultra Premium Photo Paper Glossy. You can purchase genuine Epson ink and paper online at www.epsonstore.com (U.S. sales) or www.epson.ca (Canadian sales). See Special Papers for more information.

|
5.
|
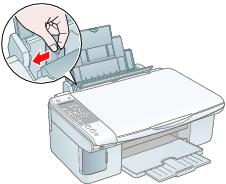
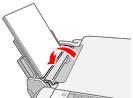
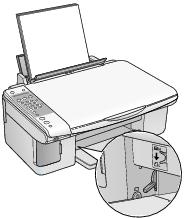
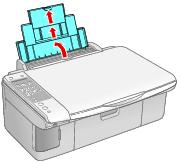
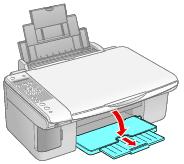
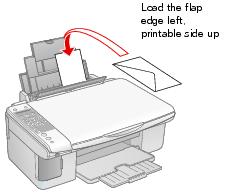
Insert the paper, printable side up, against the right edge guide. Always load it short edge first, even for landscape printing. Make sure the paper lies beneath the tabs and the arrow mark on the left edge guide.
|

You can load up to 100 sheets of plain paper or up to 20 sheets of photo paper. (See Special Papers for capacity guidelines on other paper types.)
|
8.
|
|
•
|
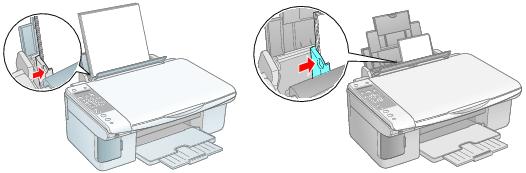
Don’t load paper above the arrow on the left edge guide. Make sure the paper is under the tabs on the left and right edge guides.
|
|
4.
|
|
7.
|
|
•
|
Envelope as the paper Type or Media Type setting
|
|
•
|
Landscape as the Orientation setting
|
Epson offers the following special papers for the CX7000F Series:
|
Epson Ultra Premium Photo Paper Glossy
Epson Ultra Premium Glossy Photo Paper |
||
|
Epson Premium Photo Paper Glossy
Epson Premium Glossy Photo Paper |
S041808 S041727
|
|
|
S041286 S041667
|
||
|
Epson Premium Photo Paper Semi-gloss
Epson Premium Semigloss Photo Paper |
||
|
Epson Photo Paper Glossy
Epson Glossy Photo Paper |
S041134 S041671 S041458 S041809
|
|
|
S041141 S041649
S041271 |
||
|
Epson Bright White Paper
Epson Premium Bright White Paper |
||
|
Epson Premium Presentation Paper Matte
Epson Matte Paper Heavyweight |
||
|
Epson Premium Presentation Paper Matte Double-sided
Epson Double-Sided Matte Paper |
||
|
Epson Presentation Paper Matte
Epson Photo Quality Ink Jet Paper |
||
|
Epson Iron-On Cool Peel Transfer Paper
Epson Iron-On Transfer Paper |
||
|
PremierArt Matte Scrapbook Photo Paper for Epson
|
* The availability of paper types and sizes varies by location.
You can purchase genuine Epson ink and paper online at www.epsonstore.com (U.S. sales) or www.epson.ca (Canadian sales). You can also purchase them from an Epson authorized reseller. To find the nearest reseller, call 800-GO-EPSON (800-463-7766).
When loading Epson ink jet papers, follow the capacity guidelines below. See Selecting the Correct Paper Type for the paper type settings you should select for these papers in the printer software.
|
Epson Bright White Paper
Epson Premium Bright White Paper |
|
|
Epson Ultra Premium Photo Paper Glossy
Epson Ultra Premium Glossy Photo Paper Epson Premium Photo Paper Glossy
Epson Premium Glossy Photo Paper Epson Premium Photo Paper Semi-gloss
Epson Premium Semigloss Photo Paper Epson Photo Paper Glossy
Epson Glossy Photo Paper Epson Premium Presentation Paper Matte
Epson Matte Paper Heavyweight Epson Premium Presentation Paper Matte Double-sided
Epson Double-Sided Matte Paper |
|
|
Epson Presentation Paper Matte
Epson Photo Quality Ink Jet Paper |
|
|
Epson Iron-On Cool Peel Transfer Paper
Epson Iron-On Transfer Paper |
Before you start, make sure the CX7000F Series is set up, its software is installed, and it is connected to your computer as described on the Start Here sheet.
|
•
|
Use the right paper.
For the best-looking photos, most vivid colors, and greatest detail, always use genuine Epson ink and paper. |
|
•
|
Choose the right printer settings.
Your CX7000F Series automatically adjusts itself for the type of paper you select in your printer settings. That’s why printer settings are important. They tell the CX7000F Series what kind of paper you’re using and adjust the ink coverage accordingly. Make sure you check your printer settings every time you print. |
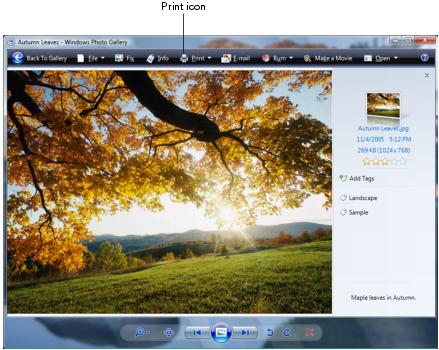
You can print your photos from an imaging application or you can use the Photo Gallery in Windows VistaTM.
|
2.
|
|
3.
|
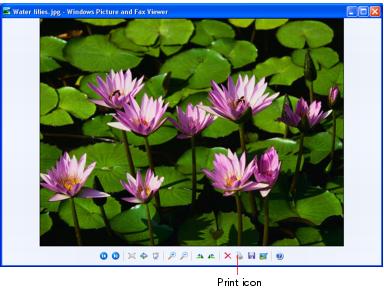
Click the Print icon at the top of the screen, then select Print from the drop-down menu that appears.
|

|
4.
|
Make sure your printer is selected, then choose the size and type of paper that you loaded in the printer.
|
Note:
If you want to print a borderless photo, see Loading Paper for Borderless Photos for a list of compatible papers and sizes.
If you want to print a borderless photo, see Loading Paper for Borderless Photos for a list of compatible papers and sizes.
|
5.
|
|
6.
|
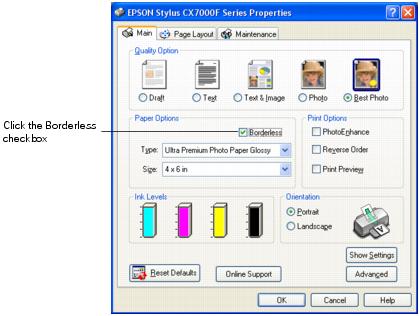
Select Photo as the Quality Option setting.
|
|
7.
|
If you are printing a borderless photo, click the Borderless check box. Read the message and click OK.
|
|
8.
|
Click OK.
|
When you return to the Windows Photo Gallery, click Print to start printing.
|
2.
|
|
4.
|
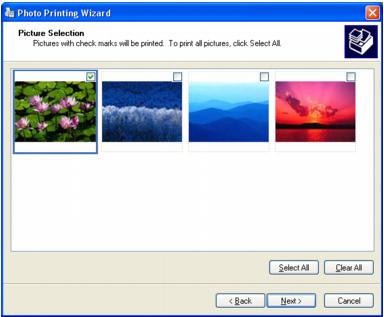
Click Next. You see a Picture Selection window (if there are other photos in your folder):
|
|
5.
|
Select the photo(s) you want to print and click Next. You see the Printing Options window:
|
|
6.
|
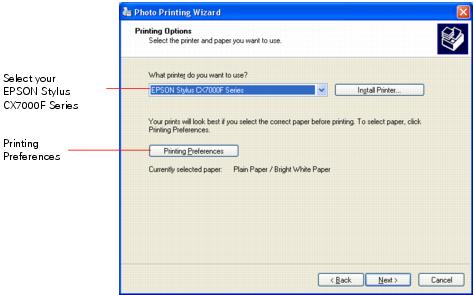
Select EPSON Stylus CX7000F Series and click Printing Preferences. You see the printer settings window:
|
|
7.
|
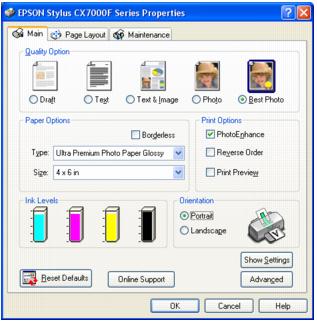
Select from these Quality Option types:
|
|
•
|
Draft: For rough drafts with reduced print quality
|
|
•
|
Text: For text-only documents with higher text quality
|
|
•
|
Text & Image: For documents with text and images with higher quality
|
|
•
|
Photo: For photos and graphics with good quality and speed
|
|
•
|
Best Photo: For photos or graphics with high print quality
|
Note:
For more information about print settings, click the ? or Help button.
The Quality Option settings on this screen give you the best combination of quality and speed for most prints. For the highest quality (Photo RPM®) on selected papers, click the Advanced button on the Main tab. Then see Customizing Windows Print Settings for instructions.
|
8.
|
Make sure the paper Type and Size settings match the paper you’ve loaded in the printer.
|
Note:
You can also print borderless photos on certain types of paper. See Printing Borderless Photos for details.
You can also print borderless photos on certain types of paper. See Printing Borderless Photos for details.
|
10.
|
Click OK.
|
|
11.
|
At the Photo Printing Wizard screen, click Next. You see a Layout Selection window:
|

|
12.
|
During printing, the following window appears to show the progress of your print job. You can use the buttons to cancel, pause, or resume printing. You can also see the approximate ink levels.

After you create a document in a software program, follow these steps to print it using the basic printer settings:
|
1.
|
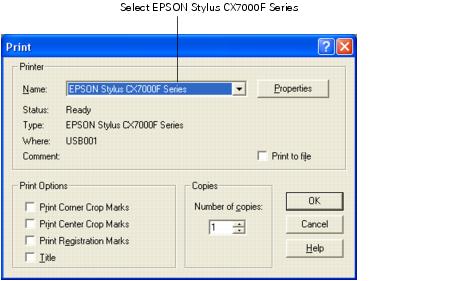
Open the File menu and select Print. You see a window like this one:
|
|
2.
|
Make sure EPSON Stylus CX7000F Series is selected.
|
|
3.
|
Click the Properties or Preferences button. (If you see a Setup, Printer, or Options button, click it. Then click Properties or Preferences on the next screen.)
|
|
4.
|
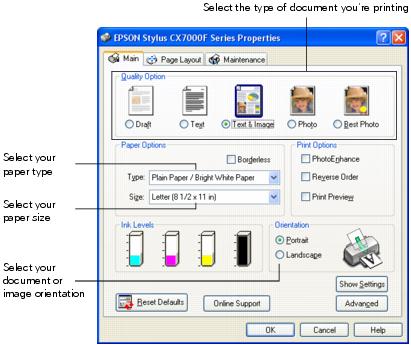
Select from these Quality Option types:
|
|
•
|
Draft: For rough drafts with reduced print quality
|
|
•
|
Text: For text-only documents with higher text quality
|
|
•
|
Text & Image: For documents with text and images with higher quality
|
|
•
|
Photo: For photos and graphics with good quality and speed
|
|
•
|
Best Photo: For photos or graphics with high print quality
|
Note:
For more information about print settings, click the ? or Help button.
The Quality Option settings on this screen give you the best combination of quality and speed for most prints. For the highest quality (Photo RPM) on selected papers, click the Advanced button on the Main tab. Then see Customizing Windows Print Settings for instructions.
|
5.
|
Make sure the paper Type and Size settings match the paper you’ve loaded in the printer.
|
Note:
You can also print borderless photos on certain types of paper. See Printing Borderless Photos for details.
You can also print borderless photos on certain types of paper. See Printing Borderless Photos for details.
|
7.
|
Click OK.
|
|
8.
|
During printing, the following window appears to show the progress of your print job. You can use the buttons to cancel, pause, or resume printing. You can also see the approximate ink levels.

When you change the printer settings within a program, they apply only to that program. If you want to change the default printer settings for all your programs, follow these steps:
|
1.
|
Right-click the
|
|
2.
|
You can still change the printer settings in your individual programs, when necessary. They will override the Windows default settings until the next time you turn on or reset your computer.
You can use advanced settings for color matching, printing at a higher resolution, or selecting a variety of special effects and layouts.
|
1.
|
|
2.
|
|
3.
|
On the Main tab, click the Advanced button in the bottom right corner of the window.
|
|
4.
|
If you see a warning note, click Continue.
|

Note:
When you select Photo RPM for the highest print quality, printing will take longer.
For more information about advanced settings, or instructions on saving them as a group so you can reuse them later, click the ? or Help button. If you want to use the Advanced screen each time you access your printer settings, click Show this screen first.
|
•
|
Click OK to save your settings, return to the Print window, and print.
|
|
•
|
Click the Basic button to return to the basic settings.
|
|
•
|
Continue with step 7 to change the layout options.
|
|
7.
|
Click the Page Layout tab and select the following page layout settings as necessary:
|

|
8.
|
|
1.
|
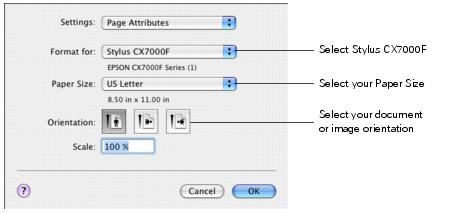
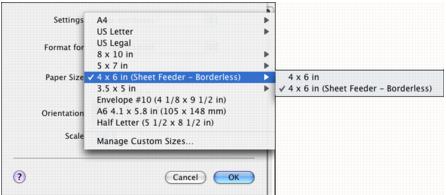
Open the File menu and select Page Setup. You see the Page Setup window:
|
|
2.
|
Select Stylus CX7000F in the Format for pop-up menu.
|
|
3.
|
Select your Paper Size. For borderless printing, select a paper size with the Sheet Feeder - Borderless option. See Printing Borderless Photos for details.
|
|
5.
|
Click OK.
|
|
6.
|
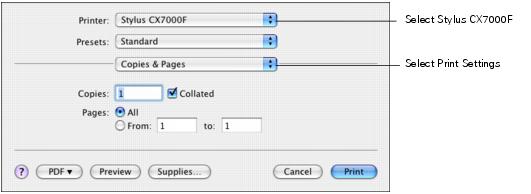
Open the File menu and select Print. You see a window like this one:
|
|
7.
|
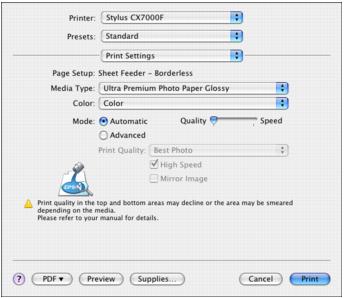
Select Stylus CX7000F in the Printer pop-up menu.
|
|
8.
|
Select Print Settings from the pop-up menu.
|

|
•
|
Copies & Pages: Select the number of copies you want or a page range.
|
|
•
|
Layout: Select page layout options.
|
|
•
|
Output Options: Save your print jobs to a PDF file (Mac OS X 10.2.x to 10.3.x only). In Mac OS X 10.4.x, click the PDF button instead.
|
|
•
|
Scheduler: Schedule your print job to print at a later time.
|
|
•
|
Paper Handling: Select page printing options, such as Reverse print order.
|
|
•
|
ColorSync or Color Management: Select ColorSync® or adjust the color controls, change the gamma setting, or turn off color adjustments in the printer software.
|
|
•
|
Cover Page (OS X 10.4.x only): Print a cover page before or after your document.
|
|
•
|
Expansion: Reduce or enlarge the image size for borderless printing. See Printing Borderless Photos for details.
|
|
•
|
Summary: View a list of all your selections.
|
|
11.
|
To save your selections for future use, select Save As from the Presets pop-up menu.
|
|
12.
|
Click Print.
|
|
13.
|
To monitor the progress of your print job, click the
|
If you’re using OS X 10.2.x, click the  Print Center icon instead, then double-click Stylus CX7000F in the Printer List window.

|
•
|
Click the print job, then click Delete to delete it
|
|
•
|
Click the print job, then click Hold to pause printing
|
|
•
|
Click a print job marked “Hold” and click Resume to resume printing
|
|
1.
|
On the print settings window, click Advanced and choose these settings as necessary:
|

Note:
When you select Photo RPM for the highest print quality, printing will take longer.
For more information on advanced settings, or instructions on saving them as a group so you can reuse them later, click the ? button.
When you select Photo RPM for the highest print quality, printing will take longer.
For more information on advanced settings, or instructions on saving them as a group so you can reuse them later, click the ? button.
|
2.
|
Click Print.
|
Your CX7000F Series automatically adjusts itself for the type of paper you select in your print settings. That’s why the paper Type or Media Type setting is so important. It tells your CX7000F Series what kind of paper you’re using and adjusts the ink coverage accordingly.
|
Select this Type or Media Type setting . . .
|
|
|
Plain Paper/Bright White Paper
|
|
|
Epson Ultra Premium Photo Paper Glossy
Epson Ultra Premium Glossy Photo Paper |
Ultra Premium Photo Paper Glossy
|
|
Epson Premium Photo Paper Glossy
Epson Premium Glossy Photo Paper |
Premium Photo Paper Glossy
|
|
Epson Photo Paper Glossy
Epson Glossy Photo Paper |
|
|
Epson Premium Photo Paper Semi-gloss
Epson Premium Semigloss Photo Paper |
Premium Photo Paper Semi-Gloss
|
|
Epson Premium Presentation Paper Matte
Epson Matte Paper Heavyweight Epson Premium Presentation Paper Matte Double-sided
Epson Double-Sided Matte Paper Epson Presentation Paper Matte
Epson Photo Quality Ink Jet Paper Epson Iron-On Cool Peel Transfer Paper
Epson Iron-On Transfer Paper |
Premium Presentation Paper Matte
|
You can print your photos with no margins, extending the image all the way to the edges of the page. Although borderless printing is a bit slower, you get beautiful snapshots and enlargements, without trimming.
See Loading Paper for Borderless Photos, then see these sections for instructions on printing borderless photos:
|
•
|
|
Paper Type or Media Type setting
|
||
|
Epson Ultra Premium Photo Paper Glossy
Epson Ultra Premium Glossy Photo Paper |
4 × 6 inches
Letter (8.5 × 11 inches) |
Ultra Premium Photo Paper Glossy
|
|
Epson Premium Photo Paper Glossy
Epson Premium Glossy Photo Paper |
Premium Photo Paper Glossy
|
|
|
Epson Photo Paper Glossy
Epson Glossy Photo Paper |
4 × 6 inches
Letter (8.5 × 11 inches) |
|
|
Epson Premium Photo Paper Semi-gloss
Epson Premium Semigloss Photo Paper |
Premium Photo Paper Semi-Gloss
|
|
|
Epson Premium Presentation Paper Matte
Epson Matte Paper Heavyweight |
8 × 10 inches
Letter (8.5 × 11 inches) |
Premium Presentation Paper Matte
|
With proper care, photographs from your CX7000F Series will last for many years. The special Epson DURABrite Ultra inks designed for your CX7000F Series are formulated to achieve improved lightfastness when used with Epson papers for prints that are properly displayed or stored. For best results, always use Epson papers.
As with traditional photos, Epson recommends proper care that will minimize color changes and lengthen display life:
|
•
|
Frame prints under glass or a protective plastic sleeve to protect them from atmospheric contaminants like humidity, smoke, and high levels of ozone.
|
|
•
|
For proper storage, keep your prints in a photo album or plastic photo storage box in acid-free, archival sleeves commonly available from most camera stores.
|
You can purchase genuine Epson ink and paper online at www.epsonstore.com (U.S. sales) or www.epson.ca (Canadian sales). You can also purchase them from an Epson authorized reseller. To find the nearest reseller, call 800-GO-EPSON (800-463-7766).
|
1.
|
|
2.
|
Click the Properties or Preferences button. (If you see a Setup, Printer, or Options button, click it. Then click Properties or Preferences on the next screen.)
|
|
3.
|
|
5.
|
|
6.
|
|
7.
|
|
8.
|
Click the Page Layout tab. You see a window like this one:
|

|
9.
|
If necessary, adjust the Expansion slider in the Borderless box to choose Min, Max, or the in-between setting.
|
Min retains most image area in your print, but there may be a small white edge on the borders of the print. Max expands the image to ensure that there are no unprinted edges, but the edges of the image may not appear in the print.
|
10.
|
Click OK.
|
|
11.
|
|
1.
|
Open the File menu and select Page Setup. You see a window like this one:
|
|
2.
|
Select Stylus CX7000F in the Format for pop-up menu.
|
|
5.
|
Click OK.
|
|
6.
|
|
7.
|
Select Stylus CX7000F in the Printer pop-up menu.
|
|
8.
|
Select Print Settings from the pop-up menu.
|
|
10.
|
|
11.
|
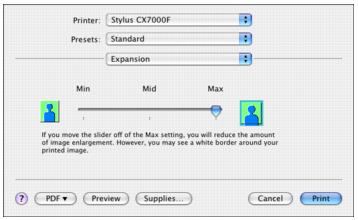
Select Expansion from the pop-up menu. You see a window like this one:
|
|
12.
|
Min retains the most image area in your print, but there may be a small white edge on the borders of the print. Max expands the image to ensure that there are no unprinted edges, but the edges of the image may not appear in the print.
|
13.
|
Click Print.
|